
With SwiftUI, we normally don’t need to worry about what happens internally on our child views. Each happily does its own thing. However, life is not always normal. When we face these circumstances, SwiftUI provides us with some great tools. Unfortunately, its documentation is brief at best. This three part article tries to put a remedy to that. We are going to learn about the PreferenceKey protocol and its associated modifiers: .preference(), .transformPreference(), .anchorPreference(), .transformAnchorPreference(), .onPreferenceChange(), .backgroundPreferenceValue() and .overlayPreferenceValue(). There is a lot to cover, so let’s begin!
SwiftUI has a mechanism that allows us to “attach” some attributes to our views. These attributes are called Preferences, and these may be passed up the view hierarchy easily. There’s even the possibility of installing a callback that executes whenever these preferences change.
Have you ever wondered how does NavigationView get the title from .navigationBarTitle(). Note that .navigationBarTitle() does not modify NavigationView directly, instead, it is invoked down the view hierarchy! So how does it do it! Well you probably guessed it already. It uses preferences. In fact, it is mentioned very briefly during the WWDC session SwiftUI Essentials. It is just a 20 second mention, and easily missed. If you’re interested, check Session 216 (SwiftUI Essentials) and jump to 52:35.
We will also learn that there are some special kind of preferences, called “anchored preferences”. These are very useful to retrieve all kinds of geometry information from our child views. We will cover this anchored preferences in the next part of this article.
Independent Views
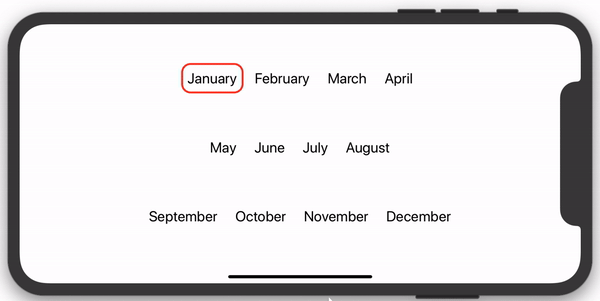
We’ll deal with PreferenceKey in a minute, but to better understand the topic, let’s start with an example that does not need preferences. In this case, each view knows what to do by itself. We are going to create a view that displays month names. When a month label is touched, a border gently appears around it (removing the one from the previous selection).
The code is very simple, nothing too special about it. First we have our ContentView:
import SwiftUI

struct EasyExample : View {
    @State private var activeIdx: Int = 0

    var body: some View {
        VStack {
            Spacer()

            HStack {
                MonthView(activeMonth: $activeIdx, label: "January", idx: 0)
                MonthView(activeMonth: $activeIdx, label: "February", idx: 1)
                MonthView(activeMonth: $activeIdx, label: "March", idx: 2)
                MonthView(activeMonth: $activeIdx, label: "April", idx: 3)
            }

            Spacer()

            HStack {
                MonthView(activeMonth: $activeIdx, label: "May", idx: 4)
                MonthView(activeMonth: $activeIdx, label: "June", idx: 5)
                MonthView(activeMonth: $activeIdx, label: "July", idx: 6)
                MonthView(activeMonth: $activeIdx, label: "August", idx: 7)
            }

            Spacer()

            HStack {
                MonthView(activeMonth: $activeIdx, label: "September", idx: 8)
                MonthView(activeMonth: $activeIdx, label: "October", idx: 9)
                MonthView(activeMonth: $activeIdx, label: "November", idx: 10)
                MonthView(activeMonth: $activeIdx, label: "December", idx: 11)
            }

            Spacer()
        }
    }
}
And our helper views:
struct MonthView: View {
    @Binding var activeMonth: Int
    let label: String
    let idx: Int

    var body: some View {
        Text(label)
            .padding(10)
            .onTapGesture { self.activeMonth = self.idx }
            .background(MonthBorder(show: activeMonth == idx))
    }
}

struct MonthBorder: View {
    let show: Bool

    var body: some View {
        RoundedRectangle(cornerRadius: 15)
            .stroke(lineWidth: 3.0).foregroundColor(show ? Color.red : Color.clear)
            .animation(.easeInOut(duration: 0.6))
    }
}
The code is pretty straight forward. Whenever a month label is tapped, we change a @State variable that keeps track of the month last tapped. We also made the border color of each month view dependant on this variable. If the view is selected, the border color is set to red. Otherwise, the border is made transparent. This case is simple, because each view draws its own border.
Collaborating Views
Let’s complicate things a little. Now, instead of fading, we want our border to move from month to month.
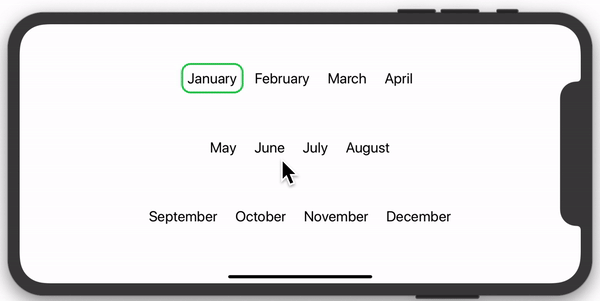
I would like you to pause for a second, and think about how you would approach this problem. Unlike the previous example where you had 12 borders (one for each view), we now have a single border, that needs to change size and position using an animation.
In this new example, the border is no longer part of the month view. Now, we need to create a separate single border, but it needs to move and resize accordingly. That means there must be a way of keeping track of the size and location of each month view.
If you read my previous article (GeometryReader to the Rescue), you already have one of the tools required to solve this problem. If you do not know how GeometryReader works, please stop here and go check that first.
One way to solve this problem, is by making each month view to use GeometryReader in order to obtain its own size and location. Each view will in turn update an array of rectangles shared with their parent (through a @Binding). Now, since the parent knows every child size and location, the border can be easily placed. This approach is good, unfortunately, having child views modifying this array raises a problem.
For certain layouts, if while building the body of a view, we modify a variable that affects the position of the parent, the child view may in turn be affected as well. This invalidates the view we are building, and it may need to start again. It could be a never-ending cycle. Fortunately, SwiftUI seems to detect this conditions and will not crash. However, it will reward you with a runtime error warning: Modifying state during view update. The quick fix to this problem is to delay the variable change, until the view update is through:
DispatchQueue.main.async {
  self.rects[k] = rect
}
Nevertheless, it seems a bit of a hack. Although in practice it works, it is an empirical solution that I am not sure will continue to work in the future. It gambles too much on how the framework works at the moment. But that, is a big unknown, because as you know… there is no documentation. Luckily, here is where PreferenceKey makes its entrance.
Introducing PreferenceKey
SwiftUI provides us with a modifier that let us add some data of our own choosing on any particular view. This data can later be interrogated by an ancestor view. There are multiple ways in which preferences can be read. The method you use will depend on what you are trying to achieve. Anyway, it looks like preferences are exactly what we need, so let’s try to solve our problem:
We first need to determine what information we would like to expose through preferences. In our example we want:
- Something to identify the view. Here we are going to use a single Int value, from 0 to 11. But it can be anything you want.
- The location and size of the text view. A CGRect value can do that.
And we put everything together with a struct we are naming MyTextPreferenceData. Notice that it should conform to Equatable:
struct MyTextPreferenceData: Equatable {
    let viewIdx: Int
    let rect: CGRect
}
Then, we need to define a struct that implements protocol PreferenceKey:
struct MyTextPreferenceKey: PreferenceKey {
    typealias Value = [MyTextPreferenceData]

    static var defaultValue: [MyTextPreferenceData] = []

    static func reduce(value: inout [MyTextPreferenceData], nextValue: () -> [MyTextPreferenceData]) {
        value.append(contentsOf: nextValue())
    }
}
The only documentation available for PreferenceKey is what it says in its definition file, which I strongly encourage you to read. But basically, you have to implement the following:
- Value: is a typealias that indicates what type of information we want to expose through the preference. In this example you see that we are using an array of MyTextPreferenceData. I will get to that in a minute.
- defaultValue: When a preference key value has not been set explicitly, SwiftUI will use this defaultValue.
- reduce: This is a static function that SwiftUI will use to merge all the key values found in the view tree. Normally, you use it to accumulate all the values it receives, but you can do whatever you want. In our case, when SwiftUI goes through the tree, it will collect the preference key values and store them together in a single array, which we will be able to access later. You should know that Values are supplied to the reduce function in view-tree order. We’ll come back to that in another example, as the order is not relevant here.
Now that we have our PreferenceKey struct setup, we need to make changes to our previous implementation:
First, we modify our MonthView. We are going to use GeometryReader in order to get the text size and location. These values need to be translated into the coordinate space of the view where the border is going to be drawn. Views can name their coordinate spaces by applying the modifier .coordinateSpace(name: "name"). Once we have our converted rect, we set the preference accordingly:
struct MonthView: View {
    @Binding var activeMonth: Int
    let label: String
    let idx: Int

    var body: some View {
        Text(label)
            .padding(10)
            .background(MyPreferenceViewSetter(idx: idx)).onTapGesture { self.activeMonth = self.idx }
    }
}

struct MyPreferenceViewSetter: View {
    let idx: Int

    var body: some View {
        GeometryReader { geometry in
            Rectangle()
                .fill(Color.clear)
                .preference(key: MyTextPreferenceKey.self,
                            value: [MyTextPreferenceData(viewIdx: self.idx, rect: geometry.frame(in: .named("myZstack")))])
        }
    }
}
Then, we create a separate view for the border. This view will change its offset and frame to match the rect corresponding to the view that has been tapped last:
RoundedRectangle(cornerRadius: 15).stroke(lineWidth: 3.0).foregroundColor(Color.green)
    .frame(width: rects[activeIdx].size.width, height: rects[activeIdx].size.height)
    .offset(x: rects[activeIdx].minX, y: rects[activeIdx].minY)
    .animation(.easeInOut(duration: 1.0))
Finally, we need to make sure that when preferences change, we update the rects array appropriately. For example, when the device rotates, or a window changes size, this code will be called:
.onPreferenceChange(MyTextPreferenceKey.self) { preferences in
    for p in preferences {
        self.rects[p.viewIdx] = p.rect
    }
}
Below is the complete code
import SwiftUI

struct MyTextPreferenceKey: PreferenceKey {
    typealias Value = [MyTextPreferenceData]

    static var defaultValue: [MyTextPreferenceData] = []

    static func reduce(value: inout [MyTextPreferenceData], nextValue: () -> [MyTextPreferenceData]) {
        value.append(contentsOf: nextValue())
    }
}

struct MyTextPreferenceData: Equatable {
    let viewIdx: Int
    let rect: CGRect
}

struct ContentView : View {

    @State private var activeIdx: Int = 0
    @State private var rects: [CGRect] = Array<CGRect>(repeating: CGRect(), count: 12)

    var body: some View {
        ZStack(alignment: .topLeading) {
            RoundedRectangle(cornerRadius: 15).stroke(lineWidth: 3.0).foregroundColor(Color.green)
                .frame(width: rects[activeIdx].size.width, height: rects[activeIdx].size.height)
                .offset(x: rects[activeIdx].minX, y: rects[activeIdx].minY)
                .animation(.easeInOut(duration: 1.0))

            VStack {
                Spacer()

                HStack {
                    MonthView(activeMonth: $activeIdx, label: "January", idx: 0)
                    MonthView(activeMonth: $activeIdx, label: "February", idx: 1)
                    MonthView(activeMonth: $activeIdx, label: "March", idx: 2)
                    MonthView(activeMonth: $activeIdx, label: "April", idx: 3)
                }

                Spacer()

                HStack {
                    MonthView(activeMonth: $activeIdx, label: "May", idx: 4)
                    MonthView(activeMonth: $activeIdx, label: "June", idx: 5)
                    MonthView(activeMonth: $activeIdx, label: "July", idx: 6)
                    MonthView(activeMonth: $activeIdx, label: "August", idx: 7)
                }

                Spacer()

                HStack {
                    MonthView(activeMonth: $activeIdx, label: "September", idx: 8)
                    MonthView(activeMonth: $activeIdx, label: "October", idx: 9)
                    MonthView(activeMonth: $activeIdx, label: "November", idx: 10)
                    MonthView(activeMonth: $activeIdx, label: "December", idx: 11)
                }

                Spacer()
                }.onPreferenceChange(MyTextPreferenceKey.self) { preferences in
                    for p in preferences {
                        self.rects[p.viewIdx] = p.rect
                    }
            }
        }.coordinateSpace(name: "myZstack")
    }
}

struct MonthView: View {
    @Binding var activeMonth: Int
    let label: String
    let idx: Int

    var body: some View {
        Text(label)
            .padding(10)
            .background(MyPreferenceViewSetter(idx: idx)).onTapGesture { self.activeMonth = self.idx }
    }
}

struct MyPreferenceViewSetter: View {
    let idx: Int

    var body: some View {
        GeometryReader { geometry in
            Rectangle()
                .fill(Color.clear)
                .preference(key: MyTextPreferenceKey.self,
                            value: [MyTextPreferenceData(viewIdx: self.idx, rect: geometry.frame(in: .named("myZstack")))])
        }
    }
}
Use Preferences Wisely
When using view preferences, you may use the geometry information from a child, in order to layout one of its ancestors. If that is the case, you should exercise caution. You risk getting stuck in a recursive loop, if the ancestor reacts to changes in the layout of a child, and the child reacts to the changes of the ancestor.
You may experience different results. The application may hang, the screen may flicker trying to redraw continuously, and most likely the CPU will spike. All these may be indications that you are using preferences wrong.
For example, if you have two views inside a VStack, and the one on the top (A) sets its height, based on the second view (B) y position, you bought yourself a nice little tight loop.
Some ways to avoid this problems, is using layout tools that make the ancestor to not affect the child. Some good techniques are: ZStack, .overlay(), .background() or geometry effects, etc. We are going to talk about GeometryEffect in an upcoming article.
What’s Next
In this article we used GeometryReader to “steal” the geometry of the month labels. However, there is a better way of doing it, and that is using Anchor Preferences. In the continuation we will learn about it, and also we’ll dive into how exactly does SwiftUI traverse the tree. There is also a different way of using preferences, without resorting to .onPreferenceChange(). We’ll talk about that too. The next part is already available here.
Before you go, I would like to note that when you start to use Preferences extensively, your code may begin to clutter and become difficult to read. Should you reach that point, I recommend you encapsulate preferences inside view extensions. I recently posted an article that explains how to do it. For more information on that, check View Extensions for Better Code Readability
In beta 4 using your code, I could not get preview to work although build appeared successful. The issue appears to be that the following line created an issue:
.preference(key: MyTextPreferenceKey.self,
                            value: [MyTextPreferenceData(viewIdx: self.idx, rect: geometry.frame(in: .named("myZstack")))])
The .named(“myZstack”) failed to work due to type conflict. .named takes an anyHashable and xcode complained it couldn’t convert a string literal to anyHashable. I changed the code to “myZstack” as! anyHashable and then it worked. Preview showed the rectangles appearing below the month names; however, the simulator correctly displayed the rectangles and appropriately animated them.
Thanks for a very interesting article. I learned a great deal!
Hi Norman,
You are right, the preview does not work well. Thanks for pointing that out, I was not aware. Fortunately, the real device and the simulator work fine. I think I should put a warning in my posts, indicating that I never use Xcode Previews. I find them very unreliable and for the time being they end up being a waste of time for me, as I have to always double check everything. I prefer to work directly with a device or the simulator. At least until it gets a little more reliable.
Cheers,
Javier.-
Thanks for this article !
I just want to say thank you for all your hard work! I really wish SwiftUI had better documentation… come on, Apple…
Thank you! It’s always nice to hear that people find this stuff interesting.
You’re the best, seriously. In terms of instructional content it’s like you teleported straight from the 90s “linux how-tos”.
That’s a compliment 🙂
I learned the hierarchy of views pattern with the run loop from working through “Modern JavaScript (Complete guide, from Novice to Ninja)” last year and it’s helped me in groking a bit of SwiftUI, but it’s still taking me a bit of time to work through the documentation and get a hang of it and you’re really helping me out in a pinch. Your blog posts are so informative and lucid.
Thank you for not being another self promotional copy pasta “here is how you make a Textbox” person (how are they not ashamed of themselves?! ruining the internet!). Thank you! Wishing you incredible amounts of success. You and the JavaScript dude are shining lights in a sea of darkness!
Much helpful for me.
Think different in SwiftUI.
Thanks!
Just a friendly reminder of swift sugar sytax:
`@State private var frames = [CGRect](repeating: CGRect(), count: 12)`
Better: @State private var frames = [CGRect](repeating: .init(), count: 12)
You are genius. I am amazed you were able to figure this out based on the (existing?) documentation. Thank you for sharing your knowledge.
Thanks! I’m glad it helped you.
Great articles! Could drag be introduced into this? I.e. for example to drag a view that then ongoing knows whether it is on top of another view or not and show a green/red type indicator if ?
I tried a little and it seems that preference changes don’t get triggered on dragging but queue up until afterwards?
Hi Jonas, the closure you should look for to monitor the drag position, is .updating(), in the DragGesture. I sent you an email with more details.
Given that the API is not documented, how did you learn this? Did you have to get insider information by talking to an Apple developer? Or did you play with the API to figure out behavior and guess at the design intent.
I worked it out from pure experimentation. I also answered that question in more detail while talking to Scott on his podcast. Check the episode here: https://twitter.com/scottsmithdev/status/1199138547292237824?s=20
what are the resources that you follow ?
When I originally wrote these series, no resources existed. Google returned nothing for PreferenceKey! So it was all based on experimenting (the core principle of my blog 😉
you are amazing
Although i offset the green border on ZStack an used .coordinateSpace(name: “myZstack”) on the same ZStack, it was not in the correct position. and i just offset using ” .offset(x:0, y:0)”
then, the green rectangle was on the center of the screen.
I have had some problems with coordinateSpace in the past. One day I’ll investigate it to see if it is a bug, or something that I did not understand.
This is really interesting. Wish there was some official documentation, though. Do we have any idea how it knows which preferences belong to your view? Or are they simply global? If they are global you’d probably need some way of identifying the preferences yourself, otherwise this could result in some weird race conditions if you have multiple views that use the same preference key (e.g. when reusing a view).
If you want to distinguish which view set a preference, you can make sure the PreferenceKey contains some way of identifying the view. In the example of the post, I used a viewIdx, to identify the view number that set the preference.
Is it unwise to use Preferences in a situation where views can be added, inserted or removed by the user? This would be a great method to keep track of each view’s location, which I’d love to do, but having a dynamic number of views really complicates things.
Hi SC, it shouldn’t be any problem. When views are inserted/removed, modifiers like
backgroundPreferenceValueget re-evaluated.Thanks. This post helped me.
Great article. I’ve read it maybe 3 times over the last 3 month when I started picking up SwiftUI. Each time for a different purpose. Today, I finally understand how and when to use preferences.
I’m going to try to use it to navigate from one TextField to the other in a natural way in my app that is displaying several TextFields dynamically built.
Good luck to me and thank you
The final example isn’t working at all in Xcode 12, production or betas.
I am wrong. It works fine in Xcode 12 🙂 Somehow the .onPreferenceChange statement had disappeared.
Thanks for the article.
I was looking for a way to keep track of only a single CGRect and came up with using a timestamp that gets updated in the onTapGesture. Thoughts on this approach?
https://pastebin.com/DY0K94Jh
I just wanted to thank you for this awesome in-depth analysis of PreferenceKeys
Even in 2021 this is still like the only helpful website for this topic 🙂
Great Job !!!
a little note that we could achive the same effect much simpler using matchedGeometryEffect without using GeometryReader or Preferences.
Hi, Maciej. Thank you for taking the time to write the comment. Yes, you are 100% right! However, this article was written when matchedGeometryEffect did not exist (iOS 13 and macOS 10.15). Since then, I also published a multi-part article about matchedGeometryEffect (part 1) and matchedGeometryEffect (part 2). In the second part, I rewrote this example with matchedGeometryEffect, under section “A Matter of Preferences” 😉