
In the first part of this series, I introduced the Animatable protocol, and how we can use it to animate Paths. Next we are going to use the same protocol to animate transform matrices, using a new tool: GeometryEffect. If you haven’t read part 1, and don’t know what the Animatable protocol is, you should read it first. However, if you are interested in GeometryEffect, but don’t care to animate it, you can skip part 1 and continue reading here.
The complete sample code for this article can be found at:
https://gist.github.com/swiftui-lab/e5901123101ffad6d39020cc7a810798
Example8 requires images from an Asset catalog. Download it from here:
https://swiftui-lab.com/?smd_process_download=1&download_id=916
GeometryEffect
GeometryEffect is a protocol that conforms to Animatable and ViewModifier. To conform with GeometryEffect, you need to implement the following method:
func effectValue(size: CGSize) -> ProjectionTransformLet’s say your method is called SkewEffect, in order to apply it to a view, you would use it like this:
Text("Hello").modifier(SkewEfect(skewValue: 0.5))Text("Hello") will be transformed with the matrix created by the SkewEfect.effectValue() method. As simple as that. Note that the changes will affect the view, but without affecting the layout of its ancestors or descendants.
Because GeometryEffect also conforms to Animatable, you may add an animatableData property, et voilà, you have an animatable effect.
You may not be aware, but you are probably using GeometryEffect all the time. If you ever used .offset(), you are actually using GeometryEffect. Let me show you how it is implemented:
public extension View {
    func offset(x: CGFloat, y: CGFloat) -> some View {
        return modifier(_OffsetEffect(offset: CGSize(width: x, height: y)))
    }

    func offset(_ offset: CGSize) -> some View {
        return modifier(_OffsetEffect(offset: offset))
    }
}

struct _OffsetEffect: GeometryEffect {
    var offset: CGSize

    var animatableData: CGSize.AnimatableData {
        get { CGSize.AnimatableData(offset.width, offset.height) }
        set { offset = CGSize(width: newValue.first, height: newValue.second) }
    }

    public func effectValue(size: CGSize) -> ProjectionTransform {
        return ProjectionTransform(CGAffineTransform(translationX: offset.width, y: offset.height))
    }
}
Animation Keyframes
Most animation frameworks have the concept of keyframes. It is a way of telling the animating engine to divide the animation in blocks. Although SwiftUI does not come with these feature, we can simulate it. In the following example, we are going to create an effect that moves a view horizontally, but it also skews at the beginning and un-skews at the end:

The skew effect needs to increase and decrease during the first and last 20% of the animation. In the middle, the skew effect will remain steady. Ok, now we have a challenge, let’s see how we solve it.
We will start by creating an effect that skews and moves our view, without paying too much attention to the 20% requirement. If you don’t know much about transformation matrices, that’s alright. It’s enough to know that: the CGAffineTransform c parameter drives the skew, and the tx, the x offset:

struct SkewedOffset: GeometryEffect {
    var offset: CGFloat
    var skew: CGFloat

    var animatableData: AnimatablePair<CGFloat, CGFloat> {
        get { AnimatablePair(offset, skew) }
        set {
            offset = newValue.first
            skew = newValue.second
        }
    }

    func effectValue(size: CGSize) -> ProjectionTransform {
        return ProjectionTransform(CGAffineTransform(a: 1, b: 0, c: skew, d: 1, tx: offset, ty: 0))
    }
}
Faking It
Ok, so now the fun part. To simulate keyframes, we will define an animatable parameter that we will change from 0 to 1. When that parameter is at 0.2, we reached the first 20% of the animation. When the parameter is 0.8 or bigger, we are in the last 20% of the animation. Our code should use that to change the effect accordingly. And to top it all off, we will also tell the effect if we are moving the view right or left, so it can skew to one side, or the other:
struct SkewedOffset: GeometryEffect {
    var offset: CGFloat
    var pct: CGFloat
    let goingRight: Bool

    init(offset: CGFloat, pct: CGFloat, goingRight: Bool) {
        self.offset = offset
        self.pct = pct
        self.goingRight = goingRight
    }

    var animatableData: AnimatablePair<CGFloat, CGFloat> {
        get { return AnimatablePair<CGFloat, CGFloat>(offset, pct) }
        set {
            offset = newValue.first
            pct = newValue.second
        }
    }

    func effectValue(size: CGSize) -> ProjectionTransform {
        var skew: CGFloat

        if pct < 0.2 {
            skew = (pct * 5) * 0.5 * (goingRight ? -1 : 1)
        } else if pct > 0.8 {
            skew = ((1 - pct) * 5) * 0.5 * (goingRight ? -1 : 1)
        } else {
            skew = 0.5 * (goingRight ? -1 : 1)
        }

        return ProjectionTransform(CGAffineTransform(a: 1, b: 0, c: skew, d: 1, tx: offset, ty: 0))
    }
}
Now, just for the fun of it, we will apply the effect to multiple views, but their animations will be staggered, using the .delay() animation modifier. The full code is available as Example6, in the gist file linked at the top of this page.
Animation Feedback
In the next example, I will show you a simple technique, that will let our view react to the progress of the effect’s animation.
We will create an effect that let us perform a 3d rotation. Although SwiftUI already has a modifier for that, .rotation3DEffect(), this one will be special. Whenever our view rotates enough to show us the other side, a Boolean binding will be updated.
By reacting to that change in the bound variable, we will be able to replace the view being rotated, right in the middle of the animation. This will create the illusion that the view has two sides. Here’s an example:
Implementing Our Effect
Let’s start by creating our effect. You will notice that the 3d rotation transform, may be slightly different than what you may be used to with Core Animation. In SwiftUI, the default anchor point is at the top leading corner of the view, while in Core Animation it is at the center. Although the existing .rotationg3DEffect() modifier let you specify an anchor point, we are building our own effect. This means we will have to deal with it ourselves. Since we cannot change the anchor point, we will need to add some translations to the mix:
struct FlipEffect: GeometryEffect {

    var animatableData: Double {
        get { angle }
        set { angle = newValue }
    }

    @Binding var flipped: Bool
    var angle: Double
    let axis: (x: CGFloat, y: CGFloat)

    func effectValue(size: CGSize) -> ProjectionTransform {

        // We schedule the change to be done after the view has finished drawing,
        // otherwise, we would receive a runtime error, indicating we are changing
        // the state while the view is being drawn.
        DispatchQueue.main.async {
            self.flipped = self.angle >= 90 && self.angle < 270
        }

        let a = CGFloat(Angle(degrees: angle).radians)

        var transform3d = CATransform3DIdentity;
        transform3d.m34 = -1/max(size.width, size.height)

        transform3d = CATransform3DRotate(transform3d, a, axis.x, axis.y, 0)
        transform3d = CATransform3DTranslate(transform3d, -size.width/2.0, -size.height/2.0, 0)

        let affineTransform = ProjectionTransform(CGAffineTransform(translationX: size.width/2.0, y: size.height / 2.0))

        return ProjectionTransform(transform3d).concatenating(affineTransform)
    }
}
By looking at the geometry effect code, there’s one interesting fact. The @Binding property flipped. We use it to report back to the view, which side is facing the user.
In our view, we will use the flipped value to conditionally display one of two views. However, in this specific example, we will use one more trick. If you pay close attention to the video, you will see that the card keeps changing. The back side is always the same, but the front side changes at every turn. So it is not as simple as showing one view for one side, and another for the other side. Instead of basing our views on flipped‘s value, we want to monitor flipped value changes. And at every full turn, we’ll use a different card.
We have an array of image names, and we want to go through each. To do that, we’ll use a custom binding variable. This trick is best explained with code:
struct RotatingCard: View {
    @State private var flipped = false
    @State private var animate3d = false
    @State private var rotate = false
    @State private var imgIndex = 0

    let images = ["diamonds-7", "clubs-8", "diamonds-6", "clubs-b", "hearts-2", "diamonds-b"]

    var body: some View {
        let binding = Binding<Bool>(get: { self.flipped }, set: { self.updateBinding($0) })

        return VStack {
            Spacer()
            Image(flipped ? "back" : images[imgIndex]).resizable()
                .frame(width: 265, height: 400)
                .modifier(FlipEffect(flipped: binding, angle: animate3d ? 360 : 0, axis: (x: 1, y: 5)))
                .rotationEffect(Angle(degrees: rotate ? 0 : 360))
                .onAppear {
                    withAnimation(Animation.linear(duration: 4.0).repeatForever(autoreverses: false)) {
                        self.animate3d = true
                    }

                    withAnimation(Animation.linear(duration: 8.0).repeatForever(autoreverses: false)) {
                        self.rotate = true
                    }
            }
            Spacer()
        }
    }

    func updateBinding(_ value: Bool) {
        // If card was just flipped and at front, change the card
        if flipped != value && !flipped {
            self.imgIndex = self.imgIndex+1 < self.images.count ? self.imgIndex+1 : 0
        }

        flipped = value
    }
}
The full code is available as Example7, in the gist file linked at the top of this page.
As mentioned earlier, instead of changing the image name, we may want to use two completely different views. That is also possible. Here’s an example:
Color.clear.overlay(ViewSwapper(showFront: flipped))
    .frame(width: 265, height: 400)
    .modifier(FlipEffect(flipped: $flipped, angle: animate3d ? 360 : 0, axis: (x: 1, y: 5)))
struct ViewSwapper: View {
let showFront: Bool
var body: some View {
Group {
if showFront {
FrontView()
} else {
BackView()
}
}
}
}Make a View Follow a Path
Next, we are going to build a completely different GeometryEffect. In this example, our effect will move a view through an arbitrary Path. This problem has two main challenges:
- How to obtain the coordinate of a specific point in the path.
- How to determine the orientation of the view while moving through the Path. In this specific case, how do we know where to point the airplane’s nose (spoiler alert, a little trigonometry goes a long way).
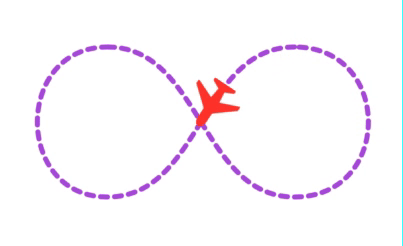
The animatable parameter of this effect will be pct. It represents the position of the airplane in the path. If we want to animate the airplane to perform a complete turn, we will use values from 0 to 1. For a value of 0.25, it means the airplane has advanced 1/4 of the path.
Finding the x, y position in the Path
In order to obtain the x and y position of the airplane at a given pct value, we are going to use the .trimmedPath() modifier of the Path struct. Given a starting and ending percentage, the method returns a CGRect. It contains the bounds of that segment of the path. For our needs, we simply call it with very close starting and ending points. It will return a very small rectangle, and we’ll use its center as our x and y position.
func percentPoint(_ percent: CGFloat) -> CGPoint {
    // percent difference between points
    let diff: CGFloat = 0.001
    let comp: CGFloat = 1 - diff

    // handle limits
    let pct = percent > 1 ? 0 : (percent < 0 ? 1 : percent)

    let f = pct > comp ? comp : pct
    let t = pct > comp ? 1 : pct + diff
    let tp = path.trimmedPath(from: f, to: t)

    return CGPoint(x: tp.boundingRect.midX, y: tp.boundingRect.midY)
}
Finding the direction
To obtain the rotation angle of our plane, we’ll use a little trigonometry. Using the technique describe above, we will get the x and y position of two points: the current position and the position just a little before now. By creating an imaginary line, we may calculate its angle, and there you have it, the airplanes direction.
func calculateDirection(_ pt1: CGPoint,_ pt2: CGPoint) -> CGFloat {
    let a = pt2.x - pt1.x
    let b = pt2.y - pt1.y

    let angle = a < 0 ? atan(Double(b / a)) : atan(Double(b / a)) - Double.pi

    return CGFloat(angle)
}
Putting it all together
Now that we know the tools we need to achieve our goals, we’ll implement the effect:
struct FollowEffect: GeometryEffect {
    var pct: CGFloat = 0
    let path: Path
    var rotate = true

    var animatableData: CGFloat {
        get { return pct }
        set { pct = newValue }
    }

    func effectValue(size: CGSize) -> ProjectionTransform {
        if !rotate { // Skip rotation login
            let pt = percentPoint(pct)

            return ProjectionTransform(CGAffineTransform(translationX: pt.x, y: pt.y))
        } else {
            let pt1 = percentPoint(pct)
            let pt2 = percentPoint(pct - 0.01)

            let angle = calculateDirection(pt1, pt2)
            let transform = CGAffineTransform(translationX: pt1.x, y: pt1.y).rotated(by: angle)

            return ProjectionTransform(transform)
        }
    }

    func percentPoint(_ percent: CGFloat) -> CGPoint {
        // percent difference between points
        let diff: CGFloat = 0.001
        let comp: CGFloat = 1 - diff

        // handle limits
        let pct = percent > 1 ? 0 : (percent < 0 ? 1 : percent)

        let f = pct > comp ? comp : pct
        let t = pct > comp ? 1 : pct + diff
        let tp = path.trimmedPath(from: f, to: t)

        return CGPoint(x: tp.boundingRect.midX, y: tp.boundingRect.midY)
    }

    func calculateDirection(_ pt1: CGPoint,_ pt2: CGPoint) -> CGFloat {
        let a = pt2.x - pt1.x
        let b = pt2.y - pt1.y

        let angle = a < 0 ? atan(Double(b / a)) : atan(Double(b / a)) - Double.pi

        return CGFloat(angle)
    }
}
The full code is available as Example8, in the gist file linked at the top of this page.
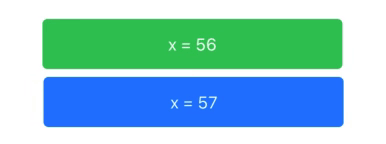
Ignored By Layout
Our final tip on GeometryEffect is the method .ignoredByLayout(). Let’s see what the documentation says:
Returns an effect producing the same geometry transform as “self” but that will only be applied while rendering its view, not while the view is performing its layout calculations. This is often used to disable layout changes during transitions, but that will only be applied while rendering its view, not while the view is performing its layout calculations. This is often used to disable layout changes during transitions.
I’ll be covering transitions soon. In the meantime, let me present an example where using .ignoredByLayout() has some obvious effects. Will see how GeometryReader reports different positions, depending on how the effect was added (i.e, with or without .ignoredByLayout()).
struct ContentView: View {
    @State private var animate = false

    var body: some View {
        VStack {
            RoundedRectangle(cornerRadius: 5)
                .foregroundColor(.green)
                .frame(width: 300, height: 50)
                .overlay(ShowSize())
                .modifier(MyEffect(x: animate ? -10 : 10))

            RoundedRectangle(cornerRadius: 5)
                .foregroundColor(.blue)
                .frame(width: 300, height: 50)
                .overlay(ShowSize())
                .modifier(MyEffect(x: animate ? 10 : -10).ignoredByLayout())

        }.onAppear {
            withAnimation(Animation.easeInOut(duration: 1.0).repeatForever()) {
                self.animate = true
            }
        }
    }
}

struct MyEffect: GeometryEffect {
    var x: CGFloat = 0

    var animatableData: CGFloat {
        get { x }
        set { x = newValue }
    }

    func effectValue(size: CGSize) -> ProjectionTransform {
        return ProjectionTransform(CGAffineTransform(translationX: x, y: 0))
    }
}

struct ShowSize: View {
    var body: some View {
        GeometryReader { proxy in
            Text("x = \(Int(proxy.frame(in: .global).minX))")
                .foregroundColor(.white)
        }
    }
}
What’s Next
The three examples we worked with today, have very little in common, except that they all use the same protocol to achieve their goals. GeometryEffect is simple. It has a single method to implement, and yet, its possibilities are endless. We just need to apply a little imagination.
Next, we will introduce our final protocol in the series: AnimatableModifier. If GeometryEffect is powerful, wait to see all the wonderful things you can do with AnimatableModifier. Here’s a quick preview of the whole series:
Javier,
This series is fantastic. Thanks for your efforts on this very important topic. I can’t wait to learn more about customizing transitions.
thank you boss
why (pct * 5) * 0.5 is smooth than pct * 0.5, i am puzzled? can u help?
“Example8 requires images from ” should be Example7
Really excellent series. Thank you. Learned a lot. Good content and presentation.
Apple should buy your tutorial tbh. Thank you for providing the only real documentation for SwiftUI Animations. 🙂
Hi! Just a quick question regarding your card example: Do you apply the .rotationEffect modifier outside of the FlipEffect GeometryEffect struct because it affords the opportunity of rotating around the z-axis on the view’s default .center unit point (as opposed to the immovable anchor point at the top left)? Otherwise I would be glad for some clarification as to why you split up the rotation into two distinct parts. Thanks in advance 🙂
If I remember correctly, I initially created the example using FlipEffect only. Then to make it more visually attractive, I added the rotationEffect. It was much easier and quicker than modifying FlipEffect. But even if you forget about the rotationEffect, you still have the anchor point problem. Looking closer to the FlipEffect code, you’ll see that I apply 2 translations and 1 rotation. That is because CGAffineTransform does not deal with anchor points, so you need to translate, rotate and translate. When UIKit uses CGAffineTransform, this is easily solved by using UIView.layer.anchorPoint. With SwiftUI, you either use functions that do not need CGAffineTransform (such as rotationEffect, which does have an optional anchor parameter). Or, if you need to use CGAffineTransform with a SwiftUI view, remember to translate the view appropriately.
Hi Javier,
Great job with all your articles. I have done some experiments with animation and I just wanted to propose an alternate solution to the flipping card using only Animatable and a classic .rotation3DEffect() modifier.
The trick is to use an animatable shape to track the rotation angle and change the image with a binding.
Feel free to comment back to tell me what you think of this solution/trick.
struct RotationShape: Shape {
@Binding var flipped: Bool
let emptyPath = Path()
var angle: Double
var animatableData: Double {
get { angle }
set { angle = newValue }
}
func path(in rect: CGRect) -> Path {
DispatchQueue.main.async {
self.flipped = self.angle >= 90 && self.angle < 270
}
return emptyPath
}
}
struct FlipView: View {
@State
var rotate = false
@State
var midRotation = false
var body: some View {
Image(self.midRotation ? "avatar" : "startrek")
.resizable()
.frame(width: 300, height: 200)
.clipShape(RoundedRectangle(cornerRadius: 20))
.rotation3DEffect(.degrees(self.rotate ? 180 : 0), axis: (x: 0, y: 5, z: 0))
.overlay(RotationShape(flipped: self.$midRotation, angle: self.rotate ? 180 : 0))
.animation(Animation.spring(response: 0.5, dampingFraction: 0.6, blendDuration: 0))
.onTapGesture {
self.rotate.toggle()
}
}
}