
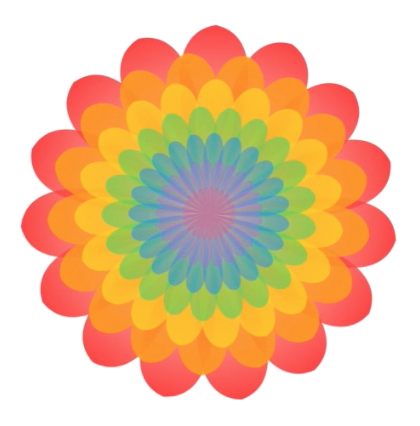
I love trigonometry. Probably because my father taught me so well. He made me see all the wonderful real-life applications it has. Everywhere you look, there’s a problem you can solve with those simple functions. From high tech problems like GPS positioning, to simple questions, such as what is the height of a building. So why would SwiftUI be an exception? If you need to draw something, chances are, trigonometry can help. The image below, is an example. Do you see the right-angled triangles? I assure you, they’re there… Don’t worry… by the end of this article, I promise you’ll see them.
This post will not be a full-on math class. It is just a compilation of some recipes you may find useful, while drawing paths, creating shapes, performing smooth transitions, etc. If you are looking for something deeper, the Internet is full of such resources.
After I wrote the “Advanced SwiftUI Animations” series, I realized that I find myself using trigonometry very often. Nothing too complex, but enough to leave some of my readers partially out of the conversation. I understand now that not everyone learning SwiftUI may have the background (or perhaps the age), to stumble upon trigonometry classes yet. Or maybe you had a trigonometry class before, but you forgot the essentials. No matter the case, this article aims at removing the obstacle in learning advanced SwiftUI techniques.
Basic Terminology
Trigonometry is all about the relation between the sides and angles of a right-angled triangle. We’ll give them arbitrary names, to make sure we all understand each other. The names are not relevant, and you can choose anything, but to be consistent through the article, these are the one I’m using:
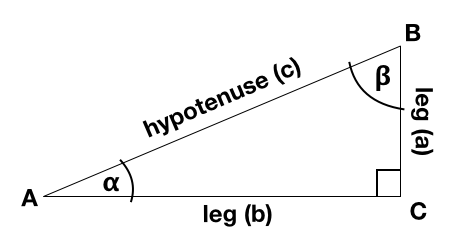
Right-Angled Triangle: Or simply right-triangle. It is a triangle, with one of its angles being 90 degrees.
Hypotenuse: It’s the largest side in the right-triangle and the one opposing the right angle.
Leg: Any of the sides, that is not the hypotenuse.
Opposed Leg: Relative to one of the angles, it is the one not “touching” it. In the example image, leg a is opposed to 𝝰 (alpha) and leg b is opposed to 𝝱 (beta)
Adjacent Leg: Relative to one of the angles, it is the one touching it. In the example image, leg a is adjacent to 𝝱 (beta) and leg b is adjacent to 𝝰 (alpha)
Degrees vs. Radians
We all know degrees. If I tell you, show me a 90 degree angle, you know immediately what to do. But if I say, show me a 1.5708 radians angle, what would you do? Well, you should do the same. They both refer to the same angle. Degrees and radians are two different scales to measure them. Luckily, converting between these two units, is very straight forward:
90° × π / 180 = 1.5708
π is the symbol for the pi number. If you need to convert from degrees to radians, you do:
radians = degrees × π / 180
To convert from radians to degrees:
degrees = radians × 180 / π
Here’s an extension you can create, in order to convert between the two units:
extension Double {
    var asDegrees: Double { return self * 180 / .pi }
    var asRadians: Double { return self * .pi / 180 }
}

let radAngle: Double = 2.0
print("radAngle radians= \(radAngle.asDegrees) degrees")

let degAngle: Double = 180
print("degAngle degrees = \(degAngle.asRadians) radians")
However, since this is a SwiftUI blog, we have another way. SwiftUI has a type named Angle, which comes with some handy initializers and computed properties:
let a = Angle(degrees: 180) // Create an angle using degrees
let b = Angle(radians: 2.3456) // Create an angle using radians

print("\(a.radians) radians = \(a.degrees) degrees")
print("\(b.radians) radians = \(b.degrees) degrees")
Why complicate things? Aren’t degrees easier to use? Maybe for us, but mathematically, radians make sense. If you are interested to know why, you may visit this page: https://teachingcalculus.com/2012/10/12/951/
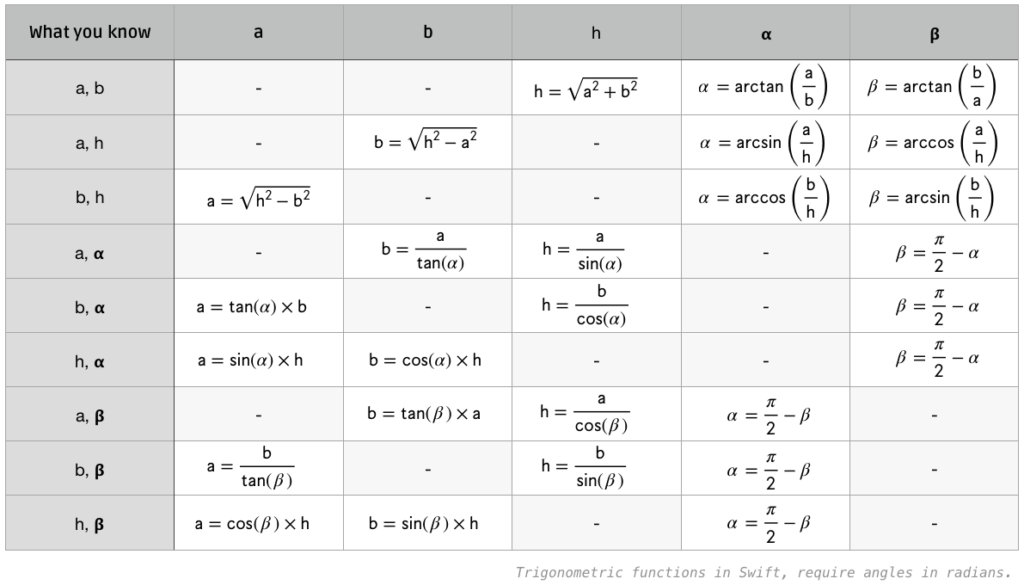
We need to be aware of radians, because trigonometric functions in Swift, require angles be specified in radians. We’ll see in a minute.
How Will Trigonometry Help Me?
As we will see next, given a right-triangle, we can derive some values from others. For example, if you know the hypotenuse and one of the angles, you can obtain the sizes of the legs and the other angles. If you know two legs, you can get the hypotenuse and the angles, etc.
And why would I need that? Well, if you start thinking about the vertices of the triangle (A, B and C) as CGPoints in your View, it all comes clear. Given two CGPoints, you can calculate the direction (angle) from one to the other (e.g., useful for a nice view rotation effect). Given the x, y coordinates of two points, you can get the distance between them (hypotenuse), given a distance and a direction from one CGPoint, you can obtain the second CGPoint coordinates, and so much more.
Another application of trigonometry, is when you need some function that let you smooth in or out an effect, a distance, a color, or anything that can be expressed numerically. We’ll see some examples below.
What is Sine, Cosine and Tangent Anyway?
You don’t wanna know. I’m kidding! You do, but as I promised, to keep this as light as possible, let’s just say that these are functions you can call with swift, they receive a single numeric value (representing an angle), and return another number (representing the proportion between two sides of the triangle).
In addition to the three basic trigonometric functions, you also have the inverse functions (arcsine, arccosine and arctangent). For example, if the sine of an angle 𝝱 is x, the arcsine of x will be 𝝱:
asin(sin(𝝱)) = 𝝱
acos(cos(𝝱)) = 𝝱
atan(tan(𝝱)) = 𝝱
The Recipes
A math teacher reading this, would probably frown upon reaching this section. But please teacher, remember this is not a math blog. It is a SwiftUI blog. I do encourage people to go and research the topic further. But this is not the place to do so. Here you’ll get what formulas to apply given the known and unknowns you have.
All these formulas are derived from the Pythagorean Theorem, the SOH-CAH-TOA mnemonic and the fact that all the angles in a triangle, make up 180 degrees. If you commit these three concepts to memory, you will never need to come back for the “recipes” again. Otherwise, go ahead and bookmark this page.
The Pythagorean Theorem says that the square of the hypotenuse equals the sum of the square of the legs:
h2 = a2 + b2
Then there’s SOH-CAH-TOA. No, it’s not a Harry Potter spell, but almost!. It’s just a mnemonic to remember these formulas easily:
Sine = Opposed / Hypotenuse
Cosine = Adjacent / Hypotenuse
Tangent = Opposed / Adjacent
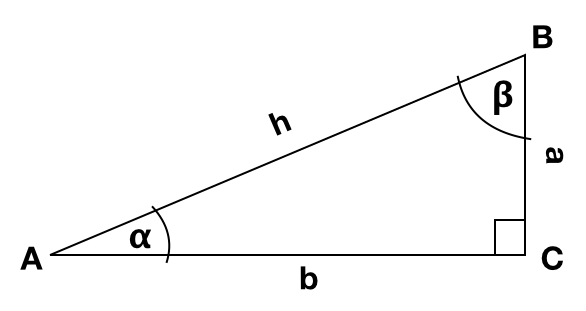
Out of these formulas, we can infer all the rest. When you need a certain value you don’t have, see what other values you do know, and pick the right formula. Note that for any value, you need to know two sides, or one side and one angle. All combinations are in the table below. Sides and angles, are layout as in the triangle of reference below:
Enough Already
That’s all the math we’ll need. We will now focus on some examples. First, let’s see how you can obtain the distance and direction between two CGPoints. Then, I’ll show you how you can, given a point coordinates, a distance and a direction, calculate the second point.
Once you get those essential concepts clear. We are going to use them to draw a polygon.
We will also see how the same ideas are applied, in order to draw a shape like the flower shown at the top of the article. And finally we’ll learn how to use the sin() function to smooth values in or out.
Angle and Direction
If you have two arbitrary points, let’s call them pt1 and pt2, we are going to obtain the distance and direction between the two.
Using SwiftUI, this code will get the direction and distance between two points:
func getDistanceAndDirection(_ pt1: CGPoint, _ pt2: CGPoint) -> (distance: CGFloat, angle: Angle) {
    let a = pt2.y - pt1.y // calculate leg a
    let b = pt2.x - pt1.x // calculate leg b

    var alpha = atan2(a, b) // calculate angle
    let s = sin(alpha) // sine of the angle
    let h = (a == 0 ? abs(b) : (a / s)) // calculate hypotenuse, and prevent divide by zero

    alpha = alpha < 0 ? alpha + (.pi * 2) : alpha // make sure angles are returned as positive values

    return (h, Angle(radians: Double(alpha)))
}
Looking at the triangle formed by the two points, the distance matches the hypotenuse of the triangle and the angle is calculated using the arc tangent.
Getting a Second Point for a Given Direction and Angle
If you know the coordinates of a point (pt1), given a direction and length, we’ll learn how to obtain the second point (pt2).
In the example, we’ll create a Shape that draws a line, given a CGPoint, an angle and a distance:
Line(pt1: CGPoint(x: 100, y: 300), direction: Angle(degrees: 25), length: 300)
                .stroke(Color.blue, lineWidth: 2)
                .frame(width: 400, height: 400)
struct Line: Shape {
let pt1: CGPoint
let direction: Angle
let length: CGFloat
func path(in rect: CGRect) -> Path {
let x = pt1.x + length * CGFloat(cos(direction.radians))
let y = pt1.y - length * CGFloat(sin(direction.radians))
let pt2 = CGPoint(x: x, y: y)
var p = Path()
p.move(to: pt1)
p.addLine(to: pt2)
return p
}
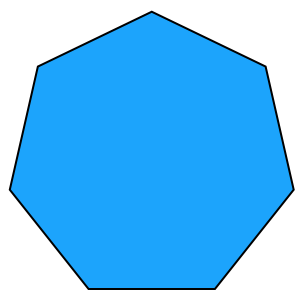
}Drawing a Polygon
In this example, we are going to create a Shape that draws a regular polygon. For the example, we’ll use a heptagon (7-sided polygon), but the code will be generic enough to create any number of sides.
A polygon has a number of vertices. We want to get the corresponding coordinates, so we can draw lines connecting them. As you can see in the image below. All vertices have the same distance to the center of a circumference:
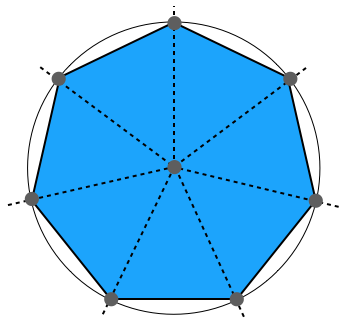
As mentioned before, between two points, you can always create a right-angled triangle.
Notice that there may be some cases, where you will be forming a triangle with one leg of zero length, and the other will be equal to the hypotenuse. Picture a triangle where one of the legs shrinks, until its length is zero. In this case the sine will be 0 and cosine = 1, or vice versa. Luckily, you don’t need to worry about that. The trigonometric functions handle that perfectly. One of such cases, is the vertex at the top (with an angle of 90 degrees). Note that cos(90) = 0 and sin(90) = 1.
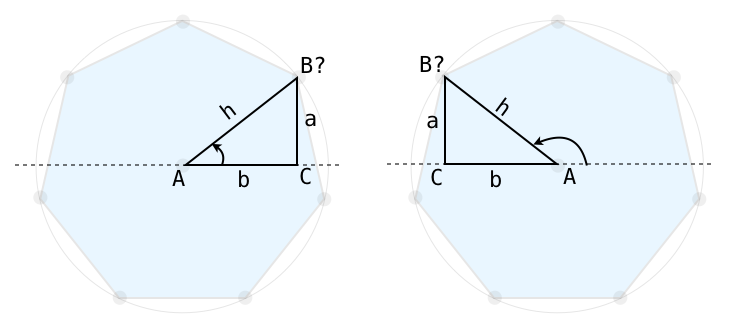
So there you have it. If we define the center of the polygon and the radius of the circumference, we can get all the vertices. The angle of each vertex will be determine by the number of sides in our polygon.
The beauty of trigonometric functions, is that they will handle angles greater than 90 degrees, by returning (in some cases) negative values. This plays wonderfully with our drawing requirements. For example, In the second triangle shown above, the cosine will be negative. This means the x coordinate of the vertex point will be smaller than the x coordinate of the center of the circumference. Just what we want. And we don’t have to worry about that in our code:
struct PolygonShape: Shape {
    var sides: Int

    func path(in rect: CGRect) -> Path {
        // hypotenuse (we make it fit inside the available rect
        let h = Double(min(rect.size.width, rect.size.height)) / 2.0

        // center
        let c = CGPoint(x: rect.size.width / 2.0, y: rect.size.height / 2.0)

        var path = Path()

        for i in 0..<sides {
            let angle = (Double(i) * (360.0 / Double(sides))) * Double.pi / 180

            // Calculate vertex position
            let pt = CGPoint(x: c.x + CGFloat(cos(angle) * h), y: c.y + CGFloat(sin(angle) * h))

            if i == 0 {
                path.move(to: pt) // move to first vertex
            } else {
                path.addLine(to: pt) // draw line to next vertex
            }
        }

        path.closeSubpath()

        return path
    }
}
A full animatable example can be found in “Advanced SwiftUI Animations – Part 1: Paths“
I See Triangles
You don’t need a sixth sense to see triangles everywhere. For example, in the flower below, each petal is made of two curves. To draw a curve, we need a beginning, a destination and a control point. You see that? Three points! What can we do with three points? You got it: a triangle! In the video below, you can see the three points we use to create half the petal. The other half is just symmetrical.
The full code is available in article “Advanced SwiftUI Animations – Part 1: Paths“
Smooth In, Smooth Out
There is a fortunate aspect of the sine (or cosine) function. If you see its graphic representation, you’ll notice that the shape of the graphic repeats. It has a minimum of -1 and maximum of 1, and f(x) starts to grow slowly, then steady and then continues to grow slowly again.
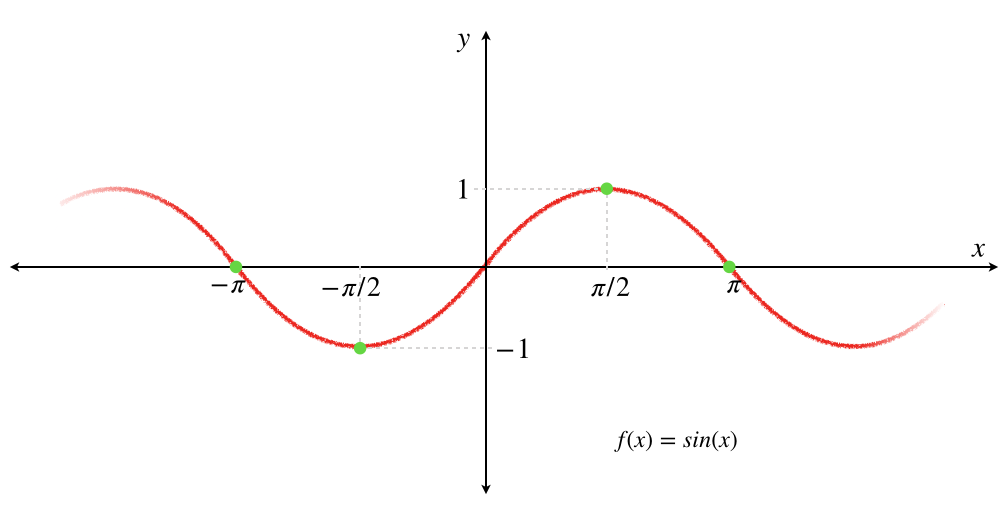
If we alter the function a little, in order to shift and compress the graph, we get a couple of waves that are ideal to increase and decrease an arbitrary value smoothly:
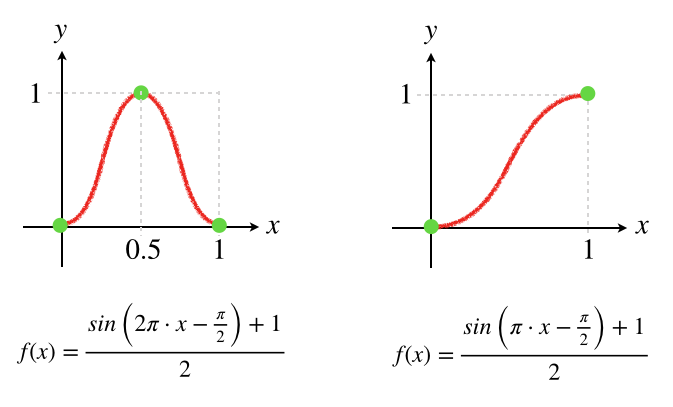
Note that there are other ways to achieve smoothing values, but this is a simple one that is worth mentioning.
You can use this function to fade in and out almost anything: sound volume, positioning, movement, color, scaling, etc. In the example below, we are going to create text with progressive scaling values:

struct ContentView: View {
    var body: some View {
        ProgressiveText(text: "AAAAAAAA")
    }
}


struct ProgressiveText: View {
    let text: String

    var body: some View {

        HStack(spacing: 10) {
            ForEach(Array(text.enumerated()), id: \.0) { (n, ch) in
                Text(String(ch)).font(.largeTitle).fontWeight(.bold).scaleEffect(self.scaleValue(n, self.text.count))
            }
        }
    }

    func scaleValue(_ idx: Int, _ totalCharacters: Int) -> CGFloat {

        // Normalized character position, to a value between 0 and 1
        let x = Double(idx) / Double(totalCharacters)

        // Get a number between 0 and 1, according to a sine wave
        let y = (sin(2 * .pi * x - (.pi / 2)) + 1) / 2.0

        // Return a scale value from 1 (normal) to 3 (3 times the size).
        return 1 + 2 * CGFloat(y)
    }
}
In Summary
Please don’t be frighten if you were never exposed to Trigonometry before. Or if you had a trigonometry class, but have bad memories, try to shake it off. Trigonometry can definitely be your friend.
Feel free to leave a comment below, and follow me on Twitter if you want to be notified when new SwiftUI articles get posted. The link is below. Until next time…
Thank you man you are the Best for ever :**
Nice article only comment is to clarify radians
Half a circle = .pi (180 degrees)
Full Circle = 2 * .p1 (360 degrees
spacing of clock hands = 2 * .pi / 12
once you start to use radians directly they are really a lot simpler and can save a lot conversions.
This is a very useful article, especially the calculation table. Before that, I used Google to get some math knowledge to understand your code.
Thank you
Thanks. That was the idea! I’m glad it helped. Cheers.
Many thanx for the equations table 😉
You are awesome !!!
getDistanceAndDirection won’t work for points with the same x coordinate. Look out for those divided-by-zero errors. I’d suggest using atan2.
Thanks for spotting that. Fixed already!
This is pure class 🙏👏👌
You are better to calculate the distance with the help of Pythagoras.
Big THANK YOU for the great article. Very helpful! 👏