In Xcode beta 3, ChartRenderer has been removed from the SDK. It seems we now should start using ImageRenderer instead to render charts. I had a feedback raised due to the ChartRenderer working monochrome, and with beta 3, I got a reply saying “ChartRenderer was removed. We suggest you use ImageRenderer instead”. This statement seems final and I am assuming ChartRenderer will not be back in a future release. I need to update this article, but in the meantime, you have been warned
WWDC ’22 brought us a couple of new ways to capture SwiftUI views. There is ImageRenderer and ChartRenderer. In general we use the first one to generate images of our views, and ChartRenderer specifically for Chart views. In this article we will explore both renderers, its tricks, quirks and limitations.
In the past, if we wanted to convert a SwiftUI view into an image we would wrap the view in a representable, and then use UIKit/AppKit to build our image. With the new renderers that is not longer necessary, but the approach is totally different and there is a whole set of considerations we need to make in order to be successful.
ImageRenderer
ImageRenderer is promising, but it comes with limitations that we will discover ahead. But let us begin with a simple example.
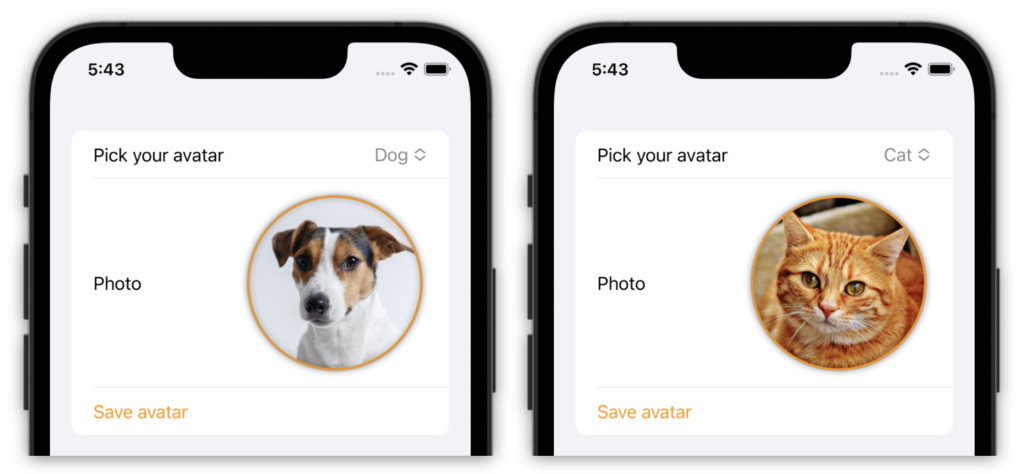
Here we have an AvatarView that clips an image in a circle, adds a border, and decorates it with a shadow. We can change the avatar name to use a different photo. Finally, we have a button to save the AvatarView into our photo library. Note that this example calls UIImageWriteToSavedPhotosAlbum, so in order to work, your Info.plist needs to have the NSPhotoLibraryAddUsageDescription key with a string describing the reason to grant access to the Photo Library.

@main
struct TestApp: App {
    var body: some Scene {
        WindowGroup {
            ContentView()
                .tint(.orange)
        }
    }
}

struct ContentView: View {
    @State var avatarName = "dog"

    var body: some View {

        let avatarView = AvatarView(imageName: avatarName)

        Form {
            Picker("Pick your avatar", selection: $avatarName) {
                Text("Cat").tag("cat")
                Text("Dog").tag("dog")
            }

            LabeledContent("Photo") {
                avatarView
            }

            Button("Save avatar", action: { saveAvatar(avatarView) })

        }
    }

    @MainActor func saveAvatar(_ view: AvatarView) {
        let renderer = ImageRenderer(content: view)

        if let image = renderer.uiImage {
            UIImageWriteToSavedPhotosAlbum(image, nil, nil, nil)
        }
    }
}

struct AvatarView: View {
    let imageName: String

    var body: some View {
        Image(imageName)
            .resizable()
            .aspectRatio(contentMode: .fit)
            .frame(height: 160)
            .clipShape(Circle())
            .overlay(Circle().stroke(.tint, lineWidth: 2))
            .padding(2)
            .overlay(Circle().strokeBorder(Color.black.opacity(0.1)))
            .shadow(radius: 3)
            .padding(4)
    }
}
If you are unfamiliar with the LabeledContent view, it is a new addition this year. It associates a label with some content (in this case the AvatarView). This helps containers like the Form view to place the label in the first column and its content in the second column, both with proper alignment.
But back to the issue. The important code is the saveAvatar() method. It is worth mentioning the need for the @MainActor attribute. Also note that the renderer may fail to generate the image, so we must check for non-nil.
Depending on the platform, you may use the nsImage, cgImage or uiImage property of the ImageRenderer, in order to render the image. There is also a render() method we could use to generate the image, but we will talk about it later and why it could be useful.
If you inspect the generated image, you will notice that the resolution may be a little low. Specially when dealing with retina displays, we should remember to also set the scale to solve this problem:
@MainActor func saveAvatar(_ view: AvatarView) {
    let renderer = ImageRenderer(content: view)
    renderer.scale = 3.0

    if let image = renderer.uiImage {
        UIImageWriteToSavedPhotosAlbum(image, nil, nil, nil)
    }
}
Dealing with Transparency
The ImageRenderer has an isOpaque property. As you may guess, if this boolean is false, the renderer will handle image transparency accordingly. That is, all the non-drawing parts of the view will be transparent in the resulting image. However, if you let the code as it is, the image saved to the photo library will not be transparent around the circle. This is because the image is saved as JPG, which does not support an alpha channel. To solve this, we modify the saveAvatar() method slightly:
@MainActor func saveAvatar(_ view: AvatarView) {
    let renderer = ImageRenderer(content: view)
    renderer.scale = 3.0
    renderer.isOpaque = false // you may avoid this line, false is the default

    if let image = renderer.uiImage {
        if let data = image.pngData(), let pngImage = UIImage(data: data) {
            UIImageWriteToSavedPhotosAlbum(pngImage, nil, nil, nil)
        }
    }
}
Using isOpaque = true may improve performance. If you know your image does not use transparency, then you may set isOpaque to true. Otherwise go with false.
In addition to the opaque setting, the renderer also let you set its colorMode.
Be respectful with the Environment 
If you look at the code, I deliberately included the app scene. The intention is to show you that right at the top of the view hierarchy, I set the environment’s tint color to orange. This is the color used by the AvatarView to tint the border of the clipping circle.
Now, if you open the saved photo from the library, you will find that the border is not orange, it is blue. The lesson here is to remember that the environment of you app will not be the same environment used by the renderer. When the ImageRenderer renders the image, it will do so with a “default” environment. If you want the avatar to have an orange border, remember to set it in the renderer’s view:
@MainActor func saveAvatar(_ view: AvatarView) {
    let renderer = ImageRenderer(content: view.tint(.orange))
    renderer.scale = 3.0
    renderer.isOpaque = false // you may avoid this line, false is the default

    if let image = renderer.uiImage {
        if let data = image.pngData(), let pngImage = UIImage(data: data) {
            UIImageWriteToSavedPhotosAlbum(pngImage, nil, nil, nil)
        }
    }
}
This may have all sorts of unexpected results if foreground color, fonts, boldness, color scheme, styles and other environment properties were set higher in the hierarchy. Be mindful of that if you encounter differences between the view on the screen and the rendered image.
ImageRenderer and Its Cryptic Talents
For this section, I recommend you run the examples on Xcode, as you continue to read. Seeing it in action will better help you with the concepts described here.
Up to this point, we explored the most common uses for the image renderer. They are pretty straight forward. However, it can do more. But to be successful, we really need to understand what is going on under the hood, or we will end up often hearing ourselves saying: “wait, what?”
Unlike most types in SwiftUI, ImageRenderer is not a struct, it is a class. And not just any class, it is an ObservableObject. That means it has a publisher you can subscribe to. All published events by the renderer, mean that the image changed.
Let’s start by introducing the view we are going to render:
struct MyView: View {
    static let colors: [Color] = [.red, .green, .purple, .yellow, .blue, .orange, .teal]

    @State var color = Self.colors[0]
    @State var counter = 0

    let timer = Timer.publish(every: 1, on: .main, in: .common).autoconnect()

    var body: some View {
        Circle()
            .fill(color)
            .frame(width: 50, height: 50)
            .shadow(radius: 3)
            .overlay {
                Text("\(counter)")
            }
            .padding(20)
            .onReceive(timer) { tm in
                guard counter + 1 < Self.colors.count else {
                    timer.upstream.connect().cancel()
                    return
                }

                counter += 1
                color = Self.colors[counter]
            }
    }
}
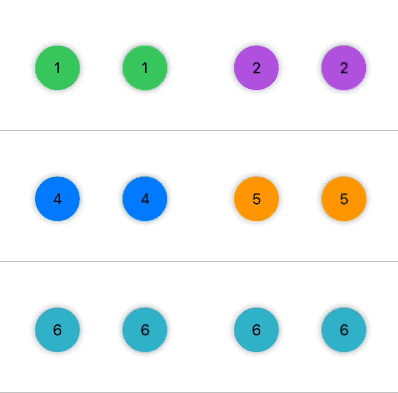
This view draws a circle with a counter. Every second, it changes color and increments the counter, until it reaches the last color, and then stops changing.
Now lets see how we can observe the ImageRenderer:

struct ContentView: View {
    @StateObject var renderer = ImageRenderer(content: MyView())

    var body: some View {

        HStack {
            // Left circle
            renderer.content

            // Right circle
            Image(uiImage: renderer.uiImage ?? UIImage())
        }
        .onReceive(renderer.objectWillChange) {
            print("\(Date()): Rendered image changed")
        }
    }
}
The circle from the right, is a raster image of the view on the left. There are two things going on with the renderer here. First, SwiftUI is observing a change in the renderer’s image. Every time the view changes, the renderer publishes an event, and renderer.uiImage updates.
The second thing is that because the renderer is an ObservableObject, we can subscribe to renderer.objectWillChange. In this case we use onReceive() to subscribe to it and print the time of the event. But you can use it to save each image to a different file. Every time an event is published, it means the image has changed.
Now, it’s important to understand that the renderer will only publish an event, if the view changed and the last image it created became out of date. This may sound strange, but consider this:
Let’s remove the Image(…) line and see what happens:
struct ContentView: View {
    @StateObject var renderer = ImageRenderer(content: MyView())

    var body: some View {

        HStack {
            renderer.content
        }
        .onReceive(renderer.objectWillChange) {
            print("\(Date()): Rendered image changed")
        }
    }
}
First thing we notice, is that we get only one counting circle. That’s to be expected. What is less intuitive, is that although the renderer has been setup with the view, onReceive() will not receive a single event (you may confirm that by checking the log). Because the renderer never created an image, there isn’t an image that changed (only the view did).
Now, if we add the following onAppear closure:
struct ContentView: View {
    @StateObject var renderer = ImageRenderer(content: MyView())

    var body: some View {

        HStack {
            renderer.content
        }
        .onReceive(renderer.objectWillChange) {
            print("\(Date()): Rendered image changed")
        }
        .onAppear {
          _ = renderer.uiImage
        }
    }
}
We are creating an image when the view appears. So when the view changes to counter == 1, the image changes and the onReceive closure is called. But only once. Because we are not creating a new image, onReceive won’t be called again, even if the view keeps changing.
Now, if we add one more line (in the onReceive closure), it is all back to working normally.
struct ContentView: View {
    @StateObject var renderer = ImageRenderer(content: MyView())

    var body: some View {

        HStack {
            renderer.content
        }
        .onReceive(renderer.objectWillChange) {
            _ = renderer.uiImage

            print("\(Date()): Rendered image changed")
        }
        .onAppear {
            _ = renderer.uiImage
        }
    }
}
Note that this is a conclusion I reached by observation. It is not documented anywhere… This means, that although unlikely, it might change in the future.
We Render A View, Not The View
One would assume that the rasterized image will look exactly the same as the view we are displaying. But not necessarily. Consider the following changes. We are going to change MyView’s implementation slightly. Instead of showing the counter, we will show a random integer. Also, for this example we don’t need the onReceive closure anymore, so we will remove it from the code:

struct ContentView: View {
    @StateObject var renderer = ImageRenderer(content: MyView())

    var body: some View {

        HStack {
            renderer.content

            Image(uiImage: renderer.uiImage ?? UIImage())
        }
    }
}

struct MyView: View {
    static let colors: [Color] = [.red, .green, .purple, .yellow, .blue, .orange, .teal]

    @State var color = Self.colors[0]
    @State var counter = 0

    let timer = Timer.publish(every: 1, on: .main, in: .common).autoconnect()

    var body: some View {
        Circle()
            .fill(color)
            .frame(width: 50, height: 50)
            .shadow(radius: 3)
            .overlay {
                Text("\(Int.random(in: 0...100))")
            }
            .padding(20)
            .onReceive(timer) { tm in
                guard counter + 1 < Self.colors.count else {
                    timer.upstream.connect().cancel()
                    return
                }

                counter += 1
                color = Self.colors[counter]
            }
    }
}
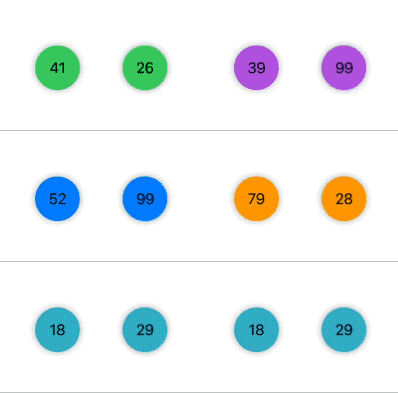
As you can see by this example, the view on the left shows a different number than the view on the right. Why is that? Because the view body() is computed by SwiftUI to display the view, but the renderer also calls the body() of the view to render the image. In each call, a different random number is created. Sounds obvious now that we say it out loud, but it caught me off guard the first time I saw it. However, we’ve already witness another effect of this fact, when we saw how the view renders with a different environment. It is obvious that the renderer is computing the view separately. In fact, you may render an image from a view that is never displayed on screen (as you will see in the example where we create a pdf for a chart).
Creating a PDF with Scalable and Searchable Graphics
The pdf examples I am posting here were tested with macOS. But they should also work on iOS. If your app is sandboxed, remember to add write access to the Downloads directory from your Xcode project’s capabilities section.
ImageRenderer (and ChartRenderer) may be used to draw into a pdf file. This has the advantage of preserving the vector nature of the images we produce, which means they will maintain their resolution when we scale them (except for images, which are already bitmap in nature). Also text will be searchable. Let’s see an example. We will change the AvatarView slightly to add some text:
struct AvatarView: View {
    let imageName: String

    var body: some View {
        VStack {
            Image(imageName)
                .resizable()
                .aspectRatio(contentMode: .fit)
                .frame(height: 160)
                .clipShape(Circle())
                .overlay(Circle().stroke(Color.white, lineWidth: 2))
                .padding(2)
                .overlay(Circle().strokeBorder(Color.black.opacity(0.1)))
                .shadow(radius: 3)
                .padding(4)

            Text("Your Avatar")
        }
    }
}
And here is the code to draw the avatar view centered in a pdf page. The text “Your Avatar” can be found with a pdf search. You may also zoom as many times as you want and you will observe how the text keeps its definition and the circle around the image does not pixelate, as it preserves its vector nature. Here’s a link to the resulting avatar.pdf.
To draw into our PDF, instead of using renderer.nsImage, we use the render method renderer.render(...). The parameter of this function, is a closure that receives two parameters: size and a rendering function. In addition to the closure, the render method has an optional parameter rasterizationScale that defaults to 1.0
struct ContentView: View {
    var body: some View {

        let avatarView = AvatarView(imageName: "cat")

        VStack {
            avatarView

            Button("Save PDF") { exportPDF(avatarView) }

        }
    }

    @MainActor func exportPDF(_ view: AvatarView) {
        let renderer = ImageRenderer(content: view)

        // Build URL
        guard let downloadsDirectory = FileManager.default.urls(for: .downloadsDirectory, in: .userDomainMask).first else { return }
        let url = downloadsDirectory.appending(path: "avatar.pdf")

        // PDF media box rect (A4)
        var mediaBox:CGRect = CGRect(x: 0, y: 0, width: 793, height: 1123)

        if let dataConsumer = CGDataConsumer(url: url as CFURL) {
            if let pdfContext = CGContext(consumer: dataConsumer, mediaBox: &mediaBox, nil) {

                // Begin PDF page
                let options: [CFString: Any] = [kCGPDFContextMediaBox: mediaBox]

                pdfContext.beginPDFPage(options as CFDictionary)

                // Render the avatar
                renderer.render { size, renderFunction in

                    // Center avatar in page
                    pdfContext.translateBy(x: (mediaBox.width - size.width) / 2.0,
                                           y: (mediaBox.height - size.height) / 2.0)

                    // Draw avatar
                    renderFunction(pdfContext)
                }

                // End PDF page
                pdfContext.endPDFPage()

                // Remember to close PDF!
                pdfContext.closePDF()
            }
        }

        print("PDF saved to \(url.path)")
    }
}
This example draws a single element into the PDF, but we can draw as many elements as we want. We will see some examples next, with the ChartRenderer where we will mix charts and other views in the same pdf.
ChartRenderer (No Longer Exists, check note at the beginning of the article)
BUG WARNING: In Xcode 14 beta 1, ChartRenderer used to render the chart in color, but in beta 2 it is rendered in grayscale. This is probably a bug (FB10491144). If you know a way of changing it, please let me know and I will update the article.
Chart views are rendered with ChartRenderer, instead of ImageRenderer. You may wonder why the difference. Aren’t charts SwiftUI views as well? Yes they are, but I suspect ChartRenderer is better equipped for handling charts. For example, when drawing a chart in a pdf file it may have more (or less) space than its screen counterpart, which may produce text labels that truncate differently. Internally there may be other reasons. Fortunately, the process of creating a pdf remains the same. And you can even have a pdf with mixed content: charts and other views in the same file.
Creating a PDF with SwiftUI Charts
First let’s build us a chart to play with. It will be a simple chart, as this article is not about composing charts. First we need some data:
import SwiftUI
import Charts

struct ContinentArea: Identifiable {
    let continent: String
    let area: Double // in million square kilometers

    var id: String { continent }
}

let data = [
    ContinentArea(continent: "Asia", area: 31),
    ContinentArea(continent: "Africa", area: 29),
    ContinentArea(continent: "Europe", area: 22),
    ContinentArea(continent: "North America", area: 21),
    ContinentArea(continent: "South America", area: 17),
    ContinentArea(continent: "Oceania", area: 8),
    ContinentArea(continent: "Antartica", area: 13),
]
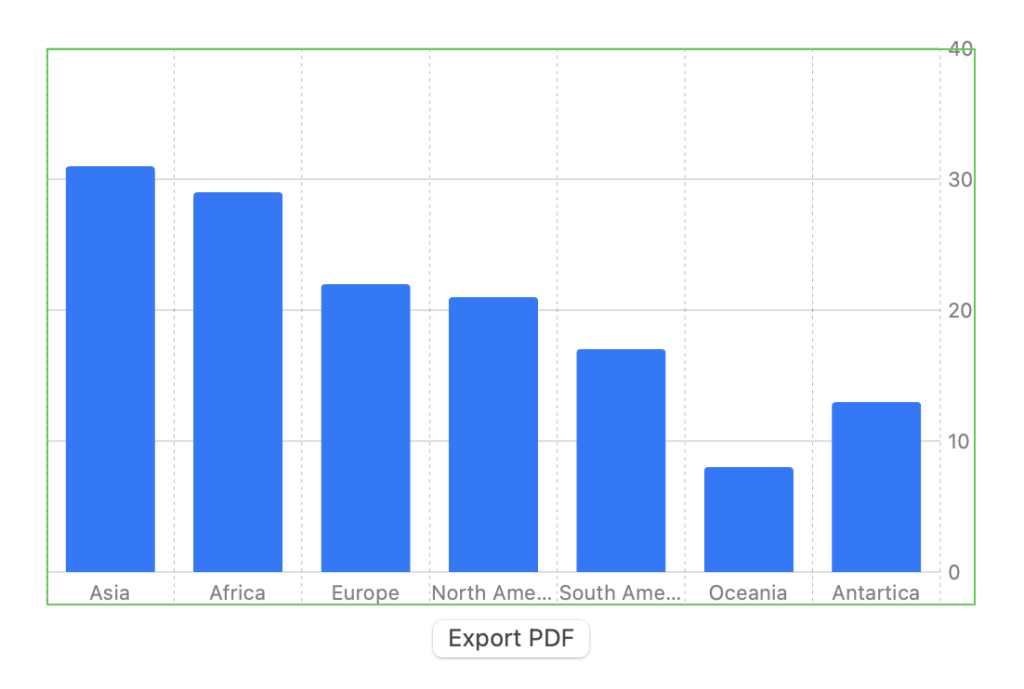
Our ContentView will look like the picture below. I added the green border deliberately, to show a bug (FB10491051), where the text in the Y-axis goes outside its bounding box. This is a minor bug, but if you place the chart at the top of the pdf page you may see the “40” text truncated and wonder why that happens. Now you know.

struct ContentView: View {
    func chartView() -> some ChartView {
        Chart(data) { val in
            BarMark(x: .value("x", val.continent), y: .value("y", val.area))
        }
    }

    var body: some View {
        let chartView = chartView()

        VStack {
            chartView
                .frame(width: 500, height: 300)
                .border(Color.green)

            Button("Export PDF") {
                exportPDF(chartView)
            }
        }
    }

    @MainActor func exportPDF<CV: ChartView>(_ chartView: CV) {
       ...
    }
}
The pdf we create will have not only the chart, but some additional text. To render the text, we will use ImageRenderer:
@MainActor func exportPDF<CV: ChartView>(_ chartView: CV) {
    // Create URL
    guard let downloadsDirectory = FileManager.default.urls(for: .downloadsDirectory, in: .userDomainMask).first else { return }
    let url = downloadsDirectory.appending(path: "chart.pdf")

    // Media box (A4 size)
    var mediaBox:CGRect = CGRect(x: 0, y: 0, width: 793, height: 1123)

    let chartSize = CGSize(width: 500, height: 300)

    if let dataConsumer = CGDataConsumer(url: url as CFURL) {
        if let pdfContext = CGContext(consumer: dataConsumer, mediaBox: &mediaBox, nil) {

            // PAGE #1
            pdfContext.beginPage(mediaBox: nil)

            // Draw title
            let titleView = Text("Continent Surface Area (in km2)")
                .font(.largeTitle)
                .bold()
                .foregroundColor(.green)
                .padding(15)
                .overlay { RoundedRectangle(cornerRadius: 10).stroke(.gray) }
                .padding(20)
                .frame(width: mediaBox.width)

            let imageRenderer = ImageRenderer(content: AnyView(titleView))

            imageRenderer.render { size, renderFunction in
                pdfContext.translateBy(x: 0, y: mediaBox.height - size.height)
                renderFunction(pdfContext)
            }

            // Draw Chart
            let chartRenderer = ChartRenderer(content: chartView)

            // Charts are drawn upside down, so we need to flip it
            pdfContext.scaleBy(x: 1, y: -1)

            chartRenderer.render(to: pdfContext, in: CGRect(origin: CGPoint(x: (mediaBox.width - chartSize.width) / 2, y: 0), size: chartSize))

            pdfContext.endPage()

            // PAGE #2
            pdfContext.beginPage(mediaBox: nil)

            // Draw text "End of Document" in the 2nd and last page
            imageRenderer.content = AnyView(Text("End of Document").frame(width: mediaBox.width))

            imageRenderer.render { size, renderFunction in
                pdfContext.translateBy(x: 0, y: (mediaBox.height - size.height) / 2)
                renderFunction(pdfContext)
            }

            pdfContext.endPage()

            // REMEBER TO CLOSE PDF!
            pdfContext.closePDF()
        }
    }
}
The code is self-explanatory, but let’s point out a few elements. Unlike the other example, this pdf is multipage. The text we place in the pdf is using an ImageRenderer. In order to reuse the same renderer with the two views, we use AnyView, because both views do not have the same type and we need to type-erase them. The other option is two use two separate ImageRenderer objects.
Finally, notice the line below. CoreGraphics draws the graph upside down, so we need to flip it:
pdfContext.scaleBy(x: 1, y: -1)Drawing a Chart in a Canvas
In addition to using ChartRenderer to create a pdf file, you may also use it to draw in a Canvas view. There is another version of the render() method, and the only difference is that it receives GraphicsContext instead of CGContext as its first parameter .
Here’s a quick example that shows how to render the chart inside the Canvas:
struct ContinentArea: Identifiable {
    let continent: String
    let area: Double // in million square kilometers

    var id: String { continent }
}

let data = [
    ContinentArea(continent: "Asia", area: 31),
    ContinentArea(continent: "Africa", area: 29),
    ContinentArea(continent: "Europe", area: 22),
    ContinentArea(continent: "North America", area: 21),
    ContinentArea(continent: "South America", area: 17),
    ContinentArea(continent: "Oceania", area: 8),
    ContinentArea(continent: "Antartica", area: 13),
]

struct ContentView: View {

    func chartView() -> some ChartView {
        Chart(data) { val in
            BarMark(x: .value("x", val.continent), y: .value("y", val.area))
        }
    }

    var body: some View {
        let chartView = chartView()

        VStack {
            chartView
                .frame(width: 500, height: 300)
                .border(Color.green)


            Canvas { context, size in
                let cr = ChartRenderer(content: chartView)

                cr.render(to: context, in: CGRect(origin: .zero, size: size))
            }
            .frame(width: 250, height:150)
        }
    }
}
If you’re not familiar with the Canvas view, check Advanced SwiftUI Animations Part 5 – Canvas
ChartRenderer has a few other options (e.g., edge insets, setting the environment, etc.). I encourage to read the documentation for all the details.
Renderer Limitations
In addition to the bugs described so far, some behaviors may be considered limiting or advantages. For example, as mention, renders are drawn separately from the screen counterparts. Depending on what you are trying to do, this may be annoying, or welcomed. But this section is about issues that are limiting only.
Animations are a No-No: If you’re view is animating and you render it mid-animation, you will get an image of the view as it is at the end of the animation. This makes sense, knowing all we know about the screen version of the view vs. its render version. But still, it is an unfortunate effect.
Certain Views are not Renderer Friendly: I haven’t tested all views, but some will just not render and produce puzzling results. This seems to be the case of control views (e.g., TextView, Toggle, etc.). Again, this makes kind of sense, so be mindful of that.
Summary
When I first started investigating renderers, I thought they would be a straight-forward topic. One example, and that’s it. It turned out to be a deeper topic though. I hope this article will save you from puzzling results. Or if you do encounter them, you will now know why.
Feel free to follow me on twitter, if you want to be notified when new articles are published. Until then!


