
And the Fun Begins!
In the first part of this post we explored the basics of the Layout protocol in order to build a strong foundation of how Layout works. Now it’s time to dive into the less commented features and how to use them in our benefit.
Part 1 – The Basics:
- Introduction
- What is the Layout Protocol?
- Family Dynamics of the View Hierarchy
- Our First Layout Implementation
- Container Alignment
- Custom Values: LayoutValueKey
- Default Spacing
- Layout Properties and Spacer()
- Layout Cache
- Great Pretenders
- Switching Layouts with AnyLayout
- Part 1 Conclusion
Part 2 – Advanced Layouts:
- Custom Animations
- Bi-directional Custom Values
- Avoiding Layout Loops and Crashes
- Recursive Layouts
- Layout Composition
- Another Composition Example: Interpolating Two Layouts
- Using Binding Parameters
- A Helpful Debugging Tool
- Final Thoughts
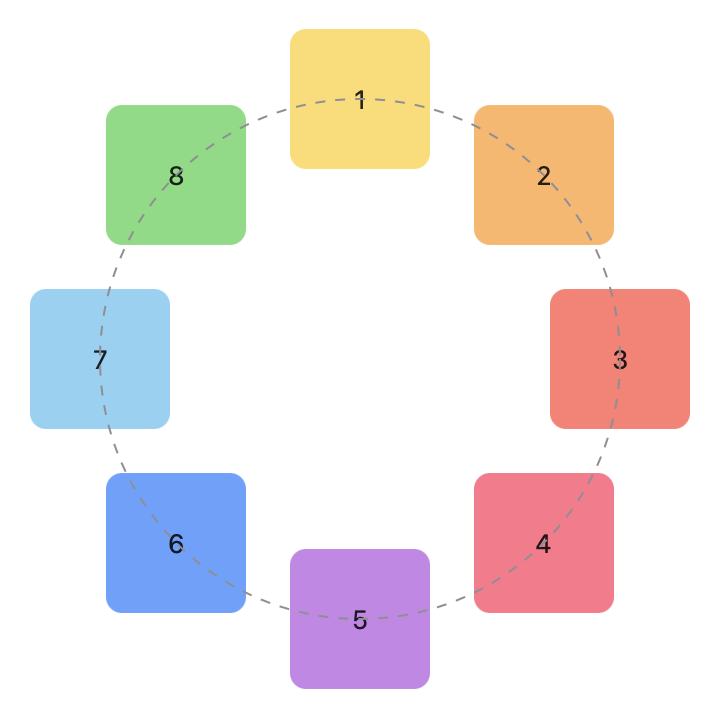
Custom Animations
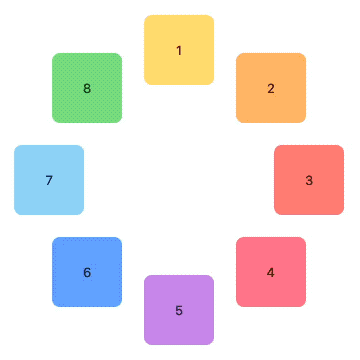
Let’s begin writing a container that places our views in a circular layout. We will call it WheelLayout:
struct ContentView: View {
    let colors: [Color] = [.yellow, .orange, .red, .pink, .purple, .blue, .cyan, .green]

    var body: some View {
        WheelLayout(radius: 130.0, rotation: .zero) {
            ForEach(0..<8) { idx in
                RoundedRectangle(cornerRadius: 8)
                    .fill(colors[idx%colors.count].opacity(0.7))
                    .frame(width: 70, height: 70)
                    .overlay { Text("\(idx+1)") }
            }
        }
    }
}

struct WheelLayout: Layout {
    var radius: CGFloat
    var rotation: Angle

    func sizeThatFits(proposal: ProposedViewSize, subviews: Subviews, cache: inout ()) -> CGSize {

        let maxSize = subviews.map { $0.sizeThatFits(proposal) }.reduce(CGSize.zero) {

            return CGSize(width: max($0.width, $1.width), height: max($0.height, $1.height))

        }

        return CGSize(width: (maxSize.width / 2 + radius) * 2,
                      height: (maxSize.height / 2 + radius) * 2)
    }

    func placeSubviews(in bounds: CGRect, proposal: ProposedViewSize, subviews: Subviews, cache: inout ())
    {
        let angleStep = (Angle.degrees(360).radians / Double(subviews.count))

        for (index, subview) in subviews.enumerated() {
            let angle = angleStep * CGFloat(index) + rotation.radians

            // Find a vector with an appropriate size and rotation.
            var point = CGPoint(x: 0, y: -radius).applying(CGAffineTransform(rotationAngle: angle))

            // Shift the vector to the middle of the region.
            point.x += bounds.midX
            point.y += bounds.midY

            // Place the subview.
            subview.place(at: point, anchor: .center, proposal: .unspecified)
        }
    }
}
SwiftUI provides built-in support for animating view positions when a layout changes. So if we change the rotation value of the wheel to 90 degrees, we will see how all views gradually move to their new position:
WheelLayout(radius: radius, rotation: angle) {
// ...
}

Button("Rotate") {
    withAnimation(.easeInOut(duration: 2.0)) {
        angle = (angle == .zero ? .degrees(90) : .zero)
    }
}
This is very nice and I could end the animation section here. However, you already know that in this blog we don’t like to swim on the surface. So let’s dive deeper and see in detail what’s happening.
When we change the angle in an animation block, SwiftUI calculates the initial and final position of each view, and then interpolates their locations during the animation, going from point A to B in a straight line. At first it doesn’t seem to be doing that, but check the following animation, and concentrate on a single view. See how they all follows the straight dashed line?

And have you stop to think what would happen if we animate the angle from 0° to 360°? I’ll give you a second… That’s right!… nothing would happen. The starting and ending position are the same, so as far as SwiftUI is concern, there is nothing to animate.
If this is what you were looking for, then great, but since we are placing the views around a circle, wouldn’t it make more sense if the views move following that imaginary circle? Well, as it turns out, doing so is ridiculously easy!
The answer to our problems is that fortunately, the layout protocol adopts the Animatable protocol! If you don’t know or remember what that is, I recommend you check my Advanced SwiftUI animations – Part 1 post, and scroll down to Animating Shape Paths.
In a nutshell, by adding the animatableData property to our Layout, we are asking SwiftUI to recalculate the layout in each frame of the animation. However, in each layout pass, the angle will receive an interpolated value. Now SwiftUI does not interpolate the positions for us. Instead it interpolates the angle value. Our layout code will do the rest.

struct Wheel: Layout {
    // ...

    var animatableData: CGFloat {
        get { rotation.radians }
        set { rotation = .radians(newValue) }
    }

    // ...
}
Adding the animatableData property is enough to make our views properly follow the circle. However, since we are here… why don’t we also make the radius animatable? If your are familiar with AnimatablePair, check the section “Animating More Than One Parameter” in the aforementioned post.
var animatableData: AnimatablePair<CGFloat, CGFloat> {
    get { AnimatablePair(rotation.radians, radius) }
    set {
        rotation = Angle.radians(newValue.first)
        radius = newValue.second
    }
}
Bi-directional Custom Layout Values
In the first part of this post we learnt how to use LayoutValues to attach information to your views, so that their proxies can expose that information in the placeSubviews and sizeThatFits methods. The idea is that information flows from the view, to the layout. We’ll see in a minute, how that can be reversed.
The ideas explained in this section should be used carefully to avoid layout loops and cpu spikes. In the next section I will explain why and how to avoid it. But do not worry, it is not that complicated. You only need to follow some guidelines.
Let’s go back to our Wheel example. Suppose we want our views to be rotated, so that they point to the center.
The Layout protocol can only determine the position of our views and their proposed sizes, but it cannot apply a style, rotation, or any other effect. If we want to do that, then the layout should have a way of communicating that back to the view. That’s when layout values become important. So far we’ve used them to pass information to the layout, but with a little creativity we can use them backwards.
I mentioned previously that LayoutValues were not restricted to passing CGFloats. You can use it for everything, and that includes Binding. In this particular case, we will use Binding<Angle>:
struct Rotation: LayoutValueKey {
    static let defaultValue: Binding<Angle>? = nil
}Note: I call this bi-directional custom layout values, because information can flow both ways. However, this is not official SwiftUI terminology, just a term I use to explain the idea more clearly.
So, in the layout’s placeSubview method, we set the angle of each subview:
struct WheelLayout: Layout {

    // ...

    func placeSubviews(in bounds: CGRect, proposal: ProposedViewSize, subviews: Subviews, cache: inout ())
    {
        let angleStep = (Angle.degrees(360).radians / Double(subviews.count))

        for (index, subview) in subviews.enumerated() {
            let angle = angleStep * CGFloat(index) + rotation.radians

            // ...

            DispatchQueue.main.async {
                subview[Rotation.self]?.wrappedValue = .radians(angle)
            }
        }
    }
}
And back in our view, we can retrieve the value, and use it to rotate the view:
struct ContentView: View {

    // ...

    @State var rotations: [Angle] = Array<Angle>(repeating: .zero, count: 16)

    var body: some View {

        WheelLayout(radius: radius, rotation: angle) {
            ForEach(0..<16) { idx in
                RoundedRectangle(cornerRadius: 8)
                    .fill(colors[idx%colors.count].opacity(0.7))
                    .frame(width: 70, height: 70)
                    .overlay { Text("\(idx+1)") }
                    .rotationEffect(rotations[idx])
                    .layoutValue(key: Rotation.self, value: $rotations[idx])
            }
        }

        // ...
}
This code will make sure all views are pointing to the center of the circle, but we can be make it much more elegant. The solution I provided requires to set an array of rotations, set them as layout values and then use those values to rotate the view. Wouldn’t it be nice if we can hide that complexity from the layout user? Here’s a rewrite that does that.
First we create a wrapper view, called WheelComponent:
struct WheelComponent<V: View>: View {
    @ViewBuilder let content: () -> V
    @State private var rotation: Angle = .zero

    var body: some View {
        content()
            .rotationEffect(rotation)
            .layoutValue(key: Rotation.self, value: $rotation)
    }
}
Then we get rid of the rotations array (we don’t need it anymore!) and wrap every view inside a WheelComponent view.
WheelLayout(radius: radius, rotation: angle) {
    ForEach(0..<16) { idx in

        WheelComponent {
            RoundedRectangle(cornerRadius: 8)
                .fill(colors[idx%colors.count].opacity(0.7))
                .frame(width: 70, height: 70)
                .overlay { Text("\(idx+1)") }
        }

    }
}
And that’s it. The user of our container only needs to remember to wrap the views inside a WheelComponent. They do not need to worry about layout values, bindings, rotations, etc. Also, not wrapping the view won’t break anything, the view will simply not rotate to point to the center.
There is one more improvement that we can add, and that is an animation for the view rotation. Below you can observe a comparison of three wheels: One does not rotate the views. The other two rotate the view to point to the center, but one doesn’t use an animation and the other does. The full code is available in this gist.
Avoiding Layout Loops and Crashes
It is a well known fact that we must not update a view’s state during layout. That is something that leads to unpredictable results and most likely a CPU spike. We’ve seen this before in situations when maybe it wasn’t too obvious that the closure was running during layout. However now, there’s no doubt at all. sizeThatFits and placeSubviews are part of the layout process. So if we are going to “cheat” with the technique described in the previous section, we must enqueue the update with DispatchQueue, as in the example above:
DispatchQueue.main.async {
    subview[Rotation.self]?.wrappedValue = .radians(angle)
}
The other potential issue of using bi-directional custom layout values, is that your views must use that value in ways that do not affect the layout. Otherwise you will incur into a layout loop.
For example, if the bindings set by placeSubviews change the color of our view, there’s no danger there. In the example, it may seem that rotation affects layout, but it does not. When you rotate a view, its surroundings are never affected, as its bounds remain the same. Same thing happens if you apply an offset, or any other transformation matrix. But in any case, I advise you to monitor the CPU to detect any potential issue with your layout. If CPU goes wild, maybe add a print statement to your placeSubviews and see if it is being called endlessly. Note that animations can increase CPU. If you want to test your containers for loops, do not check the CPU while animating.
Note that this is not new. In the past we’ve ran into this problem when we used GeometryReader to get the size of a view and passed that value to a parent view. Then that parent view used that information to change the layout which made the GeometryReader to change again, and we ended up in a layout loop. The problem is so old, that I wrote about it back when SwiftUI was starting, in the article Safely Updating the View State. Check it out for more info.
I would also like to mention a potential crash. This is not related to bi-directional custom layout values. It is something you have to consider when writing any layout. We mention that SwiftUI may call sizeThatFits multiple times to test the flexibility of your view. Across these calls, your returned values should make sense. For example, the following code crashes:
struct ContentView: View {
    var body: some View {
        CrashLayout {
            Text("Hello, World!")
        }
    }
}

struct CrashLayout: Layout {
    func sizeThatFits(proposal: ProposedViewSize, subviews: Subviews, cache: inout ()) -> CGSize {
        if proposal.width == 0 {
            return CGSize(width: CGFloat.infinity, height: CGFloat.infinity)
        } else if proposal.width == .infinity {
            return CGSize(width: 0, height: 0)
        }

        return CGSize(width: 0, height: 0)
    }

    func placeSubviews(in bounds: CGRect, proposal: ProposedViewSize, subviews: Subviews, cache: inout ())
    {
    }
}
In this case sizeThatFits returns .infinity as the minimum size, and .zero as the maximum size. That makes no sense, the minimum size cannot be bigger than the maximum!
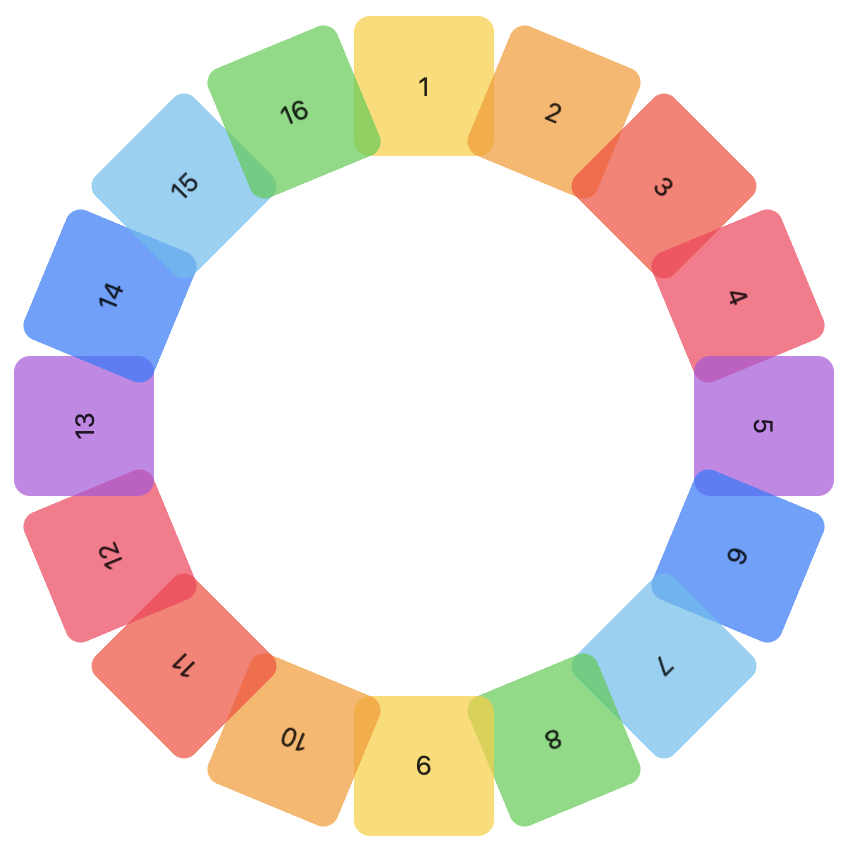
Recursive Layouts
In the following example we are going to explore recursive layouts. We will convert our previous WheelLayout view into a RecursiveWheel. Our new layout will place up to 12 views in the circle. The following 12 views will be scaled down and placed in an inner circle, and so on until there aren’t any more views to place. Scaling and rotation of views is again achieved thanks to bi-directional layout values.
In this example there are 44 views in the container, so our new container will place them in rings of 12, 12, 12 and 8 views respectively.
Note how this example uses the cache to communicate information down to the sub-layout. This is possible because cache is an inout parameter and we can update it in the placeSubviews method.
The placeSubviews method iterates and places the first 12 subviews:
for (index, subview) in subviews[0..<12].enumerated() {
  // ...
}
and then calls placeSubviews recursively, but only with the remaining views. This happens until there are no more views to place.
placeSubviews(in: bounds,
              proposal: proposal,
              subviews: subviews[12..<subviews.count],
              cache: &cache)
You may find the full code for this example in this gist.
Layout Composition
In the previous example we are using the same layout recursively. However, we can also compose different layouts into a single container. In the next example we are going to place our first 3 views horizontally on top of the view, and the last 3 views also horizontally at the bottom. The rest of the views will be placed in the middle, arranged vertically.
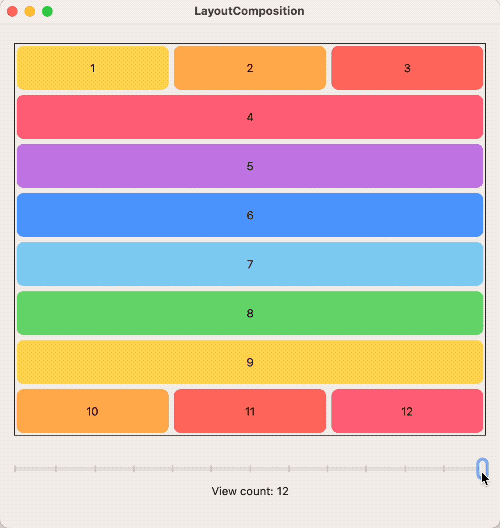
We don’t need to write the logic for spacing views horizontally or vertically, because SwiftUI already has layouts that do that: HStackLayout and VStackLayout.
There is just a little problem, with an easy fix. For some reason, the system layouts have implemented the sizeThatFits and placeSubviews method privately. This means they are not available for us to call them. However, the type-erased layout does expose all its methods. So instead of doing:
HStackLayout(spacing: 0).sizeThatFits(...) // not possiblewe can do:
AnyLayout(HStackLayout(spacing: 0)).sizeThatFits(...) // it is possible!Also, when we are working with other layouts, we kind of play the role of SwiftUI. Any cache creation and update for the sub-layouts falls into our responsibility. Fortunately again, that’s easy to handle. We simply need to add the sub-layouts caches to our own.
struct ComposedLayout: Layout {
    private let hStack = AnyLayout(HStackLayout(spacing: 0))
    private let vStack = AnyLayout(VStackLayout(spacing: 0))

    struct Caches {
        var topCache: AnyLayout.Cache
        var centerCache: AnyLayout.Cache
        var bottomCache: AnyLayout.Cache
    }

    func makeCache(subviews: Subviews) -> Caches {
        Caches(topCache: hStack.makeCache(subviews: topViews(subviews: subviews)),
               centerCache: vStack.makeCache(subviews: centerViews(subviews: subviews)),
               bottomCache: hStack.makeCache(subviews: bottomViews(subviews: subviews)))
    }

    // ...
}
You can check the full code in this gist.
Another Composition Example: Interpolating Two Layouts
The next example will create a layout that shows views in a wheel, or in a wave form. It also provides a pct parameter that goes from 0.0 to 1.0. When pct == 0.0, views are shown in the wheel, when pct == 1.0 views are shown in a sine wave form. Values in the middle interpolate the position of both.
Before we can create the composed layout, let me introduce WaveLayout. This layout has several parameter that let you change the amplitude, frequency and phase of the sine wave. Full code available in this gist.
InterpolatedLayout will calculate the size and position for both layouts (wave and wheel) and then it will interpolate those value for a final positioning. Note that in the placeSubviews method, if a subview is positioned multiple times, the last call to place() is the one that will take effect.
Interpolation of values is performed with the formula:
(wheelValue * pct) + (waveValue * (1-pct))We need a way for the WaveLayout and WheelLayout to communicate each view’s position and rotation back to the InterpolatedLayout. The way to do that, is by using the cache. Again we see that performance improvement is not the only purpose of the cache.
We also need for WaveLayout and WheelLayout to detect if they are being used by the InterpolatedLayout, so they can update the cache accordingly. These views can easily detect that condition, thanks to the standalone cache value that will only be false if the cached was created by InterpolatedLayout.
The full code (including the modified WaveLayout and WheelLayout types) is included in this gist.
Using Binding Parameters
There was an interesting question in the SwiftUI Lounges this year, asking if it was possible to use the new Layout protocol to create a hierarchical tree, connected with lines. The challenge here, is not the tree positioning of the views, but how we can draw connecting lines.
There are other ways to achieve this, for example, using the Canvas view. But since this post is all about the Layout protocol, let’s see how we can solve the connecting lines problem.
We already know by now, that lines cannot be drawn by a Layout. What we need instead, is a way for our layout to tell the view how to draw those lines. The initial thought (and what the Apple engineer suggested in that question, see the link), is to use layout values. This is what we’ve been doing in the previous examples, with the bi-directional custom values. However, after thinking about it a little more, there is a much easier way.
Instead of using layout values to separately communicate the final position of each node of the tree, it is much easier to create the whole path in layout code. Then, we just communicate the path back to the view, which will be responsible for displaying it. This is easily done, by adding a binding Layout parameter:
struct TreeLayout {

    @Binding var linesPath: Path

    // ...
}
After we finish placing our views, we know their locations and use those coordinates to create the path. Again, we must be very careful to avoid layout loops. I found that updating the path does create a loop, even when that path is drawn as a background view that won’t affect the layout. So to avoid such loop, we make sure that path actually changes, and only then, we update the binding. That successfully breaks the loop.
let newPath = ...

if newPath.description != linesPath.description {

    DispatchQueue.main.async {
        linesPath = newPath
    }

}
The other interesting part of this challenge, is to tell the layout how these views connect hierarchically. For this example, I created two UUID layout values. One identifies the view, and the other is the id of the parent view.
struct ContentView: View {
    @State var path: Path = Path()

    var body: some View {
        let dash = StrokeStyle(lineWidth: 2, dash: [3, 3], dashPhase: 0)

        TreeLayout(linesPath: $path) {
            ForEach(tree.flattenNodes) { node in
                Text(node.name)
                    .padding(20)
                    .background {
                        RoundedRectangle(cornerRadius: 15)
                            .fill(node.color.gradient)
                            .shadow(radius: 3.0)
                    }
                    .node(node.id, parentId: node.parentId)
            }
        }
        .background {
            // Connecting lines
            path.stroke(.gray, style: dash)
        }
    }
}

extension View {
    func node(_ id: UUID, parentId: UUID?) -> some View {
        self
            .layoutValue(key: NodeId.self, value: id)
            .layoutValue(key: ParentNodeId.self, value: parentId)
    }
}
There are some considerations to take when using this code. There should only be one node with a nil parent id (the root node) and you should be careful to avoid a reference loop (e.g., two nodes being parent of each other).
Also note that this is a great candidate to place it inside a ScrollView with both vertical and horizontal scrolling.
Note that this is a basic implementation and only intended to illustrate how this can be accomplished. There are many potential optimizations, but the key elements required to make a Tree layout are there. The full gist is available here.
A Helpful Debugging Tool
Back when SwiftUI was brand new and I was trying to understand how layout worked, I wished I had a tool like the one I’m introducing here. Up until now, the best tool we had so far, was adding a border around the view to visually see the limits of the view. That was our best ally.
Using borders is still a great debugging tool, but we can add a new one. Thanks to the new Layout protocol I created a modifier that’s very useful when trying to understand why a view is not doing what you think it should. Code is available in this gist and the modifier is:
func showSizes(_ proposals: [MeasureLayout.SizeRequest] = [.minimum, .ideal, .maximum]) -> some ViewYou apply it on any view, and an overlay will float on top of the topTrailing corner of the view, showing the size for a given set of proposals. If you leave the proposals unspecified, the minimum, ideal and maximum sizes are overlayed.
MyView()
    .showSizes()
Some usage examples:
showSizes() // minimum, ideal and maximum

showSizes([.current, .ideal]) // the current size of the view and the ideal size

showSizes([.minimum, .maximum]) // the minimum and maximum

showSizes([.proposal(size: ProposedViewSize(width: 30, height: .infinity))]) // a specific proposal
Here are more examples:
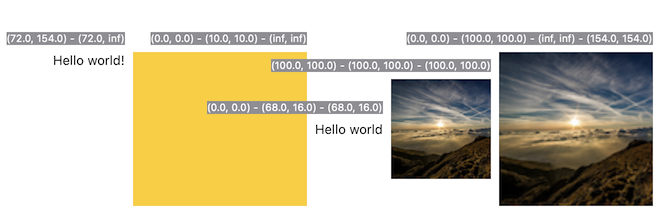
ScrollView {
    Text("Hello world!")
}
.showSizes([.current, .maximum])

Rectangle()
    .fill(.yellow)
    .showSizes()

Text("Hello world")
    .showSizes()

Image("clouds")
    .showSizes()

Image("clouds")
    .resizable()
    .aspectRatio(contentMode: .fit)
    .showSizes([.minimum, .ideal, .maximum, .current])
Suddenly all makes sense. For example, check the Image sizes with and without resizable(). Isn’t it oddly satisfying to finally be able to see those numbers?
Final Thoughts
Even if you do not intend to write your own Layout container, understanding how it works will help you understand how layout in general works in SwiftUI.
Personally, diving into the Layout protocol has given me a newfound appreciation for the team that wrote the code for containers like HStack or VStack. I often took these views for granted and thought of them as simple and uncomplicated containers. Well, try to write your own version to replicate an HStack in every scenario, with multiple types of views and layout priorities competing for the same space… that’s a nice challenge!
Feel free to follow me on twitter if you want to be notified of new articles. Until next time!