With the release of Xcode 12 beta 4, two bugs mentioned in this articles got fixed! I marked those sections with a note, but will keep the sections for a couple of weeks, in case some readers are still using an older beta. The elimination of those bugs will make our life easier. In fact, some snippets of code in this article could be simplified a little. I will do so when I remove the aforementioned sections.
This is the second and last part of the MatchedGeometryEffect series. These parts can be read in any order. Depending which aspect you would like to focus on first.
In part 1, we learned how to match the geometry of a view that is removed from the hierarchy, with one that is inserted. This, combined with custom transitions and animatable modifiers, offers a lot of possibilities for hero animations and other interesting effects. The first part includes a full Xcode project with a demonstration on how to create App Store-like transitions.
In this part 2, we are going to focus on how to match the geometry of two or more views that are simultaneously part of the view hierarchy. We will also explore how to use this to create more hero animations, but this time, without needing to use custom transitions. This will be showcased by the example shown in the video below (Xcode project included here).
What is the Source of Geometry
So far, we have ignored the isSource parameter of the matchedGeometryEffect() method. But no longer. The source parameter, which is a boolean, determines if the view is providing the geometry, or “borrowing” it. So far, we used the default value (true) for both. This is because, in the case of transitioning views, they both are the source. In other words, the incoming view uses the geometry of the outgoing view as the starting size and position of the transition, and the outgoing view uses the geometry of the incoming view as the final size and position of the transition. Both views are source and consumer at the same time!
Now, in this new use case, that’s not true any more. In fact, if multiple views are part of the hierarchy, only one can be the source for a specific id and namespace. If you set multiple views as the source for a given id+namespace combination, SwiftUI won’t like it, and it will complain at runtime with a very clear log message:
Multiple inserted views in matched geometry group Pair<Int, ID>(first: 1, second: SwiftUI.Namespace.ID(id: 6)) have `isSource: true`, results are undefined.
Meet Our New Friend
Before we continue describing every detail of the matchedGeometryEffect modifier, let me introduce a view that will be used extensively in the examples below.
The view is named Triangle, and it simply draws a triangle pointing in the given direction, fills it with the specified color, and adds a black border. You may wonder why this shape? Well, we need the examples to be able to show multiple overlapping views but still, be able to seem them all.

You can always see up to 4 overlapping Triangle views, provided they have different directions:

The code for the view can be found in this gist: squared-triangle.swift
Introducing matchedGeometryEffect, again…
We already introduced matchedGeometryEffect in Part 1 of this article, but as I mentioned there, it has two distinct uses. To my eyes they are so different, that I think it deserves a new introduction. This time, however, we’ll have in mind its other use case (i.e., matching geometries between two or more existing views).
In a nutshell, when we have two views paired with matchedGeometryEffect, we are simply telling one view (A) to offset its position and resize itself, to match the position and size of another view (B).
The view that provides the geometry (B in the example above) is the source, while the other (A), I will call it the consumer. Note that “consumer” is not the official terminology, but I think it is fitting. Officially, the view is either the source or not the source. But that would make the article a little confusing. From now on, when I refer to a consumer view, I am referring to a view that is NOT the source of a matchedGeometryEffect. But enough talk, let’s start coding…
Baby Steps
Before we begin, let’s do a quick recap on what are the id and namespace parameters of the matchedGeometryEffect modifier. Both the id and the namespace together, identify a view. If two views have a call with the same id and namespace, those two views will be matched. The type of match will depend on the other parameters. To learn a little more on id and namespace, refer to part 1.
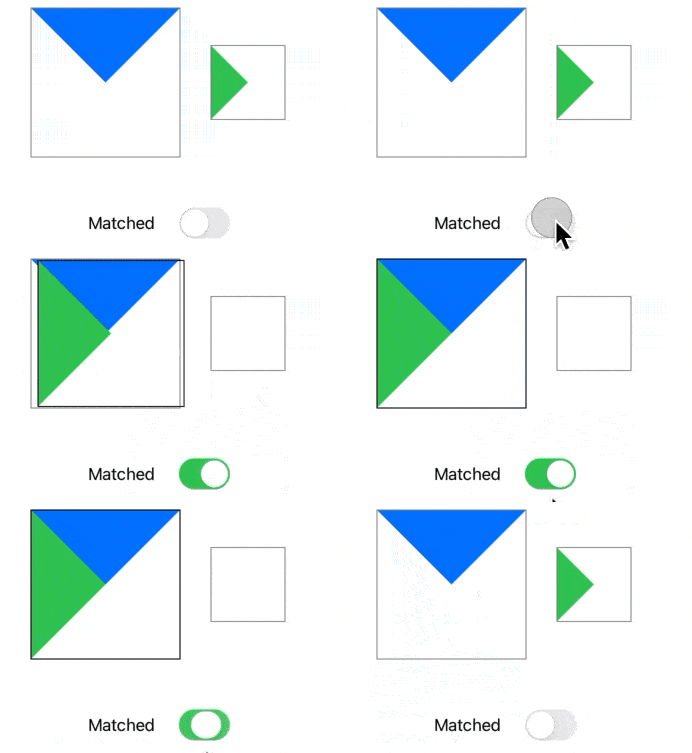
In our first example, we have two views. We use the toggle to make the one on the right use the geometry (i.e., size and position) of the view on the left.
struct ExampleView: View {
    @Namespace var ns
    @State var matched: Bool = false

    var body: some View {
        VStack(spacing: 50) {
            HStack(spacing: 30) {
                Triangle(.down, .blue)
                    .matchedGeometryEffect(id: "id1", in: ns)
                    .frame(width: 150, height: 150)
                    .border(Color.gray)

                Triangle(.right, .green)
                    .matchedGeometryEffect(id: matched ? "id1" : "", in: ns, isSource: false)
                    .frame(width: 75, height: 75)
                    .border(Color.gray)

            }

            Toggle(isOn: $matched.animation(.easeInOut), label: { Text("Matched") }).frame(width: 140)

        }
    }
}
The first thing to notice is the fact that changes to any parameter in matchedGeometryEffect can be animated. All of them, when they produce a change in size or position if triggered by a variable in an animation closure, it will animate. And when I say any of the parameters, I really mean any. That includes the less intuitive, such as namespace and isSource.
The next thing to observe, is that the view that is taking the geometry, is not releasing its space in the layout. Any surrounding views will remained unaffected. As a matter of fact, the gray border remains there, as it is placed after the call to matchedGeometryEffect(). Remember that so called SwiftUI modifiers DO NOT actually modify the view. Instead a new view is created to wrap around the “modified” view. If you ever get confuse with this, think matchedGeometryEffect as a modifier that simply calls .offset() and .frame() on the view. It just does it with the right values to make the second view, “match” the first one.
Let’s see how we can replicate the same results, but WITHOUT using matchedGeometryEffect:
struct ExampleView: View {
    @Namespace var ns
    @State var matched: Bool = false

    var body: some View {
        let viewArect = CGRect(x: 0, y: 0, width: 150, height: 150)
        let viewBrect = CGRect(x: 180, y: 37.5, width: 75, height: 75)

        return VStack(spacing: 30) {
            HStack(spacing: 30) {
                Triangle(.down, .blue)
                    .frame(width: 150, height: 150)
                    .border(Color.gray)

                Triangle(.right, .green)
                    // ---------------------------------------------------
                    // Here begins our .matchedGeometryEffect equivalent
                    .offset(x: !matched ? 0 : (viewArect.origin.x - viewBrect.origin.x) + ((viewArect.size.width - viewBrect.size.width) / 2.0),
                            y: !matched ? 0 : (viewArect.origin.y - viewBrect.origin.y) + ((viewArect.size.height - viewBrect.size.height) / 2.0))
                    .frame(width: !matched ? viewBrect.size.width : viewArect.size.width,
                           height: !matched ? viewBrect.size.height : viewArect.size.height)
                    // Here ends our .matchedGeometryEffect equivalent
                    // ---------------------------------------------------
                    .frame(width: 75, height: 75)
                    .border(Color.gray)

            }

            Toggle(isOn: $matched.animation(.easeInOut), label: { Text("Matched") }).frame(width: 140)
        }
    }
}
As you can see, the code not only is much harder to understand, but it also requires that in order to perform all the calculations, we know the geometry of both views in the same coordinate space! As you probably know by now, that is not easy to do with SwiftUI. You need to use GeometryReader, preferences, or maybe some other method. In this case, I hardcoded the values because I know them in advance. That is rarely the case.
Properties to Match, but Not So Much
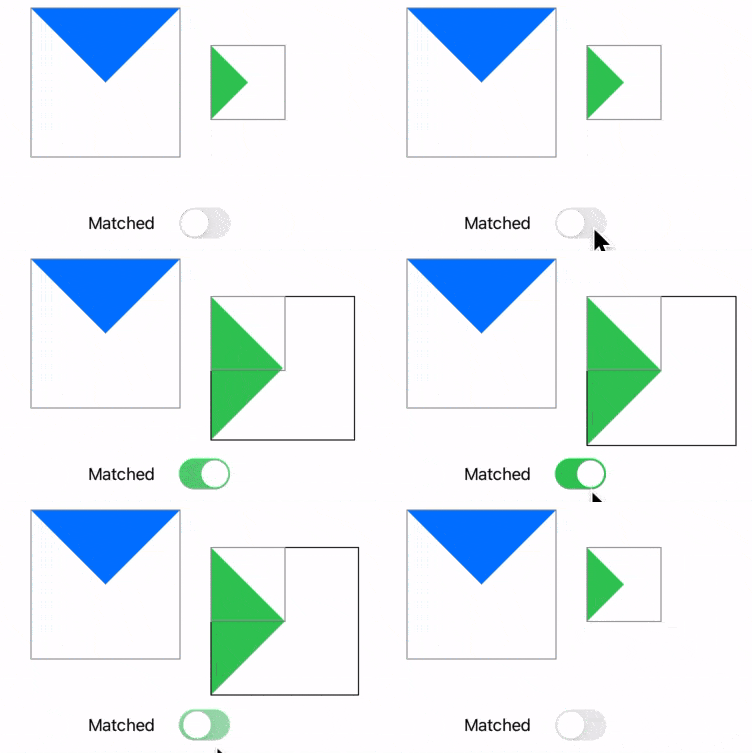
The modifier provides the option to decide how much geometry we want to match. That is, you can match just the position, the size, or both. By default, it matches both. This is done by specifying .position, .size, or .frame in the properties parameter of the view that is NOT the source. The properties parameter on the source view will have no effect. The source view always shares all its geometry (i.e., both size and position). It is up to the consumer, to decide what it wants to take.
Let’s see with an example. So far we have omitted the properties parameter. It defaults to .frame, which means match both size and position. Now we will slightly modify the call to matchedGeometryEffect on the second view to match only the size:
.matchedGeometryEffect(id: matched ? "id1" : "", in: ns, properties: .size, isSource: false)The same can be done with the position:
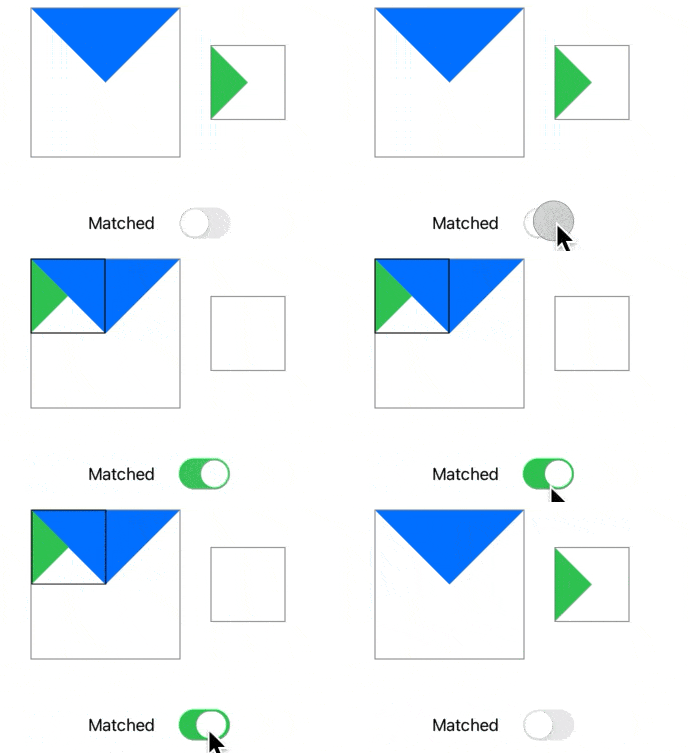
.matchedGeometryEffect(id: matched ? "id1" : "", in: ns, properties: .position, isSource: false)Anchoring Paired Views
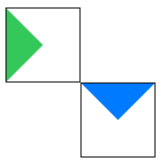
The matchedGeometryEffect has another parameter (the last one I promise), called anchor. A very useful parameter indeed. When calling matchedGeometryEffect, we specify the anchor point both in the source view, and the consumer view. When the view is repositioned, it is done in a way that both anchor points match. Anchor points are expressed as UnitPoint types (more on this later).
In the first example, we are setting .topLeading as the anchor point for the source view (blue) and .bottomTrailing for the consumer view (green).
struct ExampleView: View {
    @Namespace var ns

    var body: some View {
        Group {
            Triangle(.down, .blue)
                .matchedGeometryEffect(id: "id1", in: ns, anchor: .topLeading)
                .frame(width: 75, height: 75)

            Triangle(.right, .green)
                .matchedGeometryEffect(id: "id1", in: ns, anchor: .bottomTrailing, isSource: false)
                .frame(width: 75, height: 75)
        }
    }
}
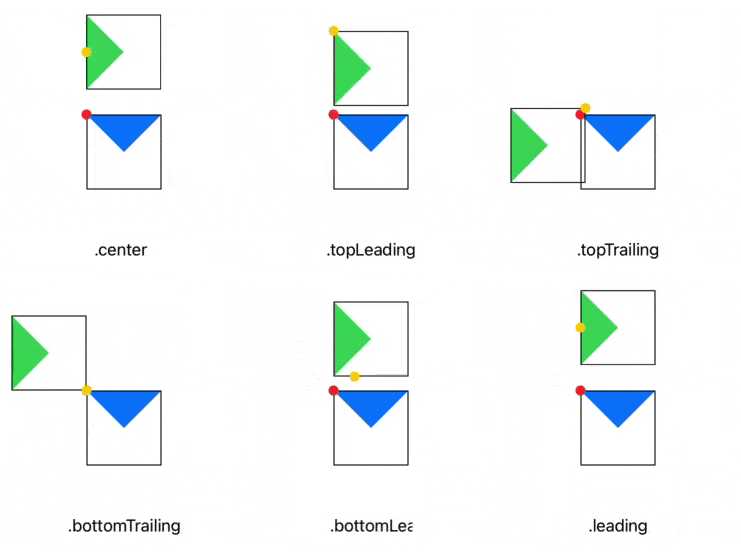
To better illustrate, let’s see the following animation. Here, the source view (blue) is always using .topLeading as its anchor point, and the consumer view (green) goes over all 9 predefined anchor points. The red dot shows the anchor point of the source view, and the yellow dot shows the anchor point of the consumer view. A gist file for the code that generates this animation can be found here: matchedGeometryEffect-anchorPoints.swift
The Problem with the Anchor Parameter (fixed)
The bug described in this section has been fixed in Xcode 12 beta 4, so you can skip this section. I will keep it here for readers that have not updated to beta 4 yet, but I’ll remove this section soon.
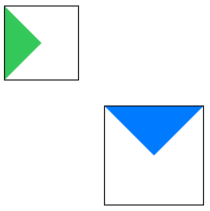
So far, using anchor points seems pretty straight forward. Doesn’t it? Well, that is as far as both views have the same size. When we match two views only by its position, and if they do not happen to have the same size, things get a little trickier. See the example below:
struct ExampleView1: View {
    @Namespace var ns

    var body: some View {
        Group {
            Triangle(.down, .blue)
                .matchedGeometryEffect(id: "id1", in: ns, anchor: .topLeading)
                .frame(width: 100, height: 100)

            Triangle(.right, .green)
                .matchedGeometryEffect(id: "id1", in: ns, properties: .position, anchor: .bottomTrailing, isSource: false)
                .frame(width: 75, height: 75)
        }
    }
}
Let’s analyze what happened here. Although we specified to anchor both views by their .topLeading and .bottomTrailing points, as in the first anchor example, their corners are not touching now. Can you guess why? Let me add a dotted line to superimpose the size of the source view over the consumer view:
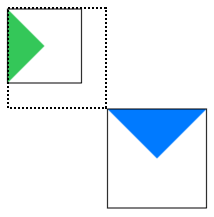
The .bottomTrailing point for the green view is using the size of the blue view, even though we only asked to match position, not size. This, to me, looks like a bug. I don’t see much benefit from this behavior and I would very much rather have the anchor point in the green view refer to its own size. I have submitted a bug report to Apple (FB7967943) and I am really wishing this is a bug and not the intended behavior. However, if this is not fixed by the GM, I doubt it will ever be changed, as it would break any code written following the current behavior.
At the time of this writing we are only at beta 2. Let’s wait and see.
A Quick Word on UnitPoint
A quick note on the UnitPoint type. In most examples, when using UnitPoint, we specify the predefined values (.topLeading, .center, .bottom, etc.). This could mislead you into thinking that UnitPoint is an enum, but it is not. It is a struct, with some static variables for predefined points, such as:
.topLeading = UnitPoint(x: 0, y: 0)
.bottomTrailing = UnitPoint(x: 1, y:0)
.center = UnitPoint(x: 0.5, y: 0.5)
This means you can actually define your own UnitPoint, let’s say: UnitPoint(x: -1.5, y: 0.5). Note that you can also use negative numbers and exceed the 0.0 to 1.0 range, as long as it makes sense.
Annoying Behavior With No Source (fixed)
The bug described in this section has been fixed in Xcode 12 beta 4, so you can skip this section. I will keep it here for readers that have not updated to beta 4 yet, but I’ll remove this section soon.
There’s another behavior, which I’d like to think is a bug and not by design. I have filed a bug report (FB7968204). We’ll see what happens.
When we have a matchedGeometryEffect that we want to disable, we can simply set the id to a value not used by any source. However, when two views have the same match id and none is the source, I would expect the match to not occur. However, as things stand on beta 2, one of the none source views will act as the source. In my experience so far, it is always the first view the one that takes the role.
This is very annoying. Every view you want to unpair will need a completely different id. This is clear in the example of the next section.
Multiple Groups, with Multiple Views
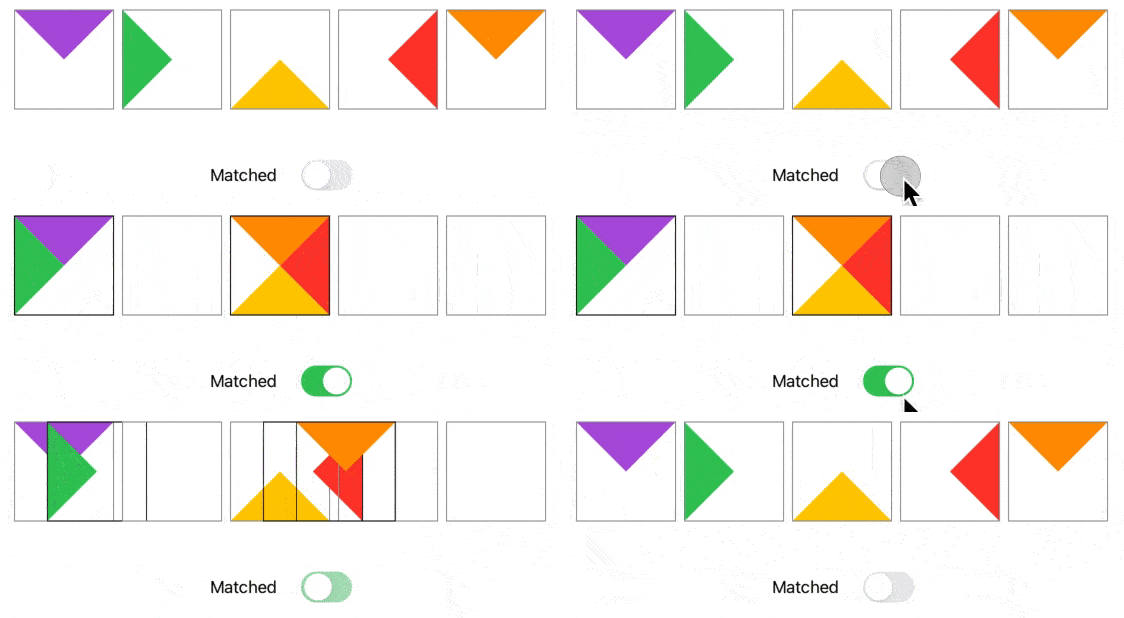
So far, we have paired two views together. However, matchedGeometryEffect does not limit you there. You can have multiple groups of pairings, and each group can have more than two views, as long as only one is the source for that group. Let’s see an example:
struct ExampleView1: View {
    @Namespace var ns
    @State private var matched = false

    var body: some View {
        VStack(spacing: 50) {
            HStack {
                Triangle(.down, .purple)
                    .matchedGeometryEffect(id: "id1", in: ns)
                    .frame(width: 100, height: 100)
                    .border(Color.gray)

                Triangle(.right, .green)
                    .matchedGeometryEffect(id: matched ? "id1" : "unpair1", in: ns, isSource: false)
                    .frame(width: 100, height: 100)
                    .border(Color.gray)

                Triangle(.up, .yellow)
                    .matchedGeometryEffect(id: "id2", in: ns)
                    .frame(width: 100, height: 100)
                    .border(Color.gray)

                Triangle(.left, .red)
                    .matchedGeometryEffect(id: matched ? "id2" : "unpair2", in: ns, isSource: false)
                    .frame(width: 100, height: 100)
                    .border(Color.gray)

                Triangle(.down, .orange)
                    .matchedGeometryEffect(id: matched ? "id2" : "unpair3", in: ns, isSource: false)
                    .frame(width: 100, height: 100)
                    .border(Color.gray)
            }
        }

        Toggle(isOn: $matched.animation(.easeInOut), label: { Text("Matched") }).frame(width: 140)

    }
}
Multiple Namespaces
We introduced Namespaces in part 1. We mentioned already that namespaces are useful to prevent id collision between views. However, we can also benefit from them inside a single view by using multiple namespaces. In some cases, this could be useful. Instead of changing all the ids, you just change a single namespace. In the example below, you can also appreciate how a single view can serve its geometry with more than one id value.
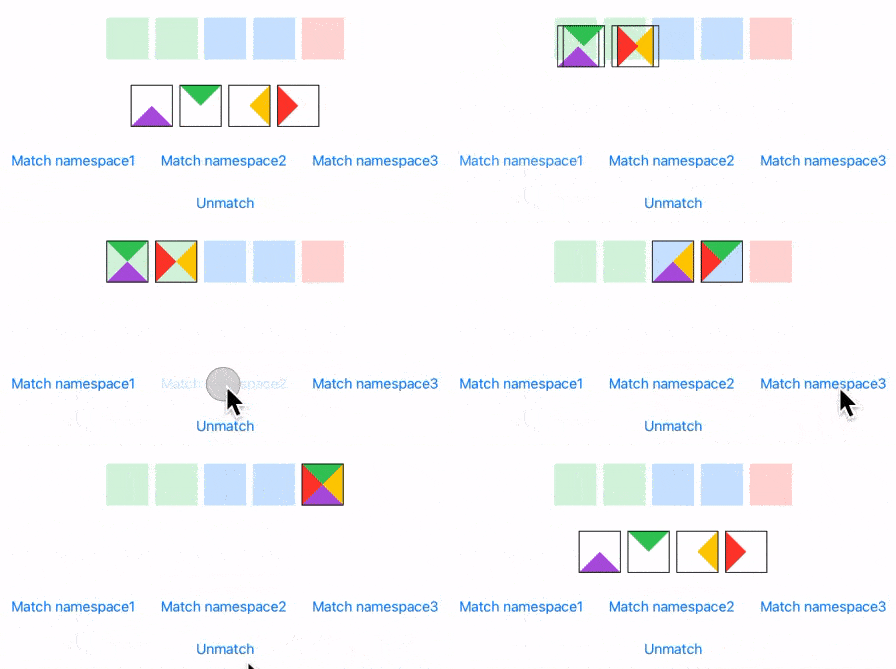
struct ExampleView: View {
    @Namespace var empty_namespace
    @Namespace var namespace1
    @Namespace var namespace2
    @Namespace var namespace3

    @State private var namespaceInUse = 0

    var body: some View {
        let colors: [Color] = [.purple, .green, .yellow, .red]
        let direction: [Triangle.Direction] = [.up, .down, .left, .right]

        VStack(spacing: 30) {
            HStack {
                // Namespace 1
                Rectangle().fill(Color.green.opacity(0.2)).frame(width: 50, height: 50)
                    .matchedGeometryEffect(id: 0, in: namespace1)
                    .matchedGeometryEffect(id: 1, in: namespace1)

                Rectangle().fill(Color.green.opacity(0.2)).frame(width: 50, height: 50)
                    .matchedGeometryEffect(id: 2, in: namespace1)
                    .matchedGeometryEffect(id: 3, in: namespace1)

                // Namespace 2
                Rectangle().fill(Color.blue.opacity(0.2)).frame(width: 50, height: 50)
                    .matchedGeometryEffect(id: 0, in: namespace2)
                    .matchedGeometryEffect(id: 2, in: namespace2)

                Rectangle().fill(Color.blue.opacity(0.2)).frame(width: 50, height: 50)
                    .matchedGeometryEffect(id: 1, in: namespace2)
                    .matchedGeometryEffect(id: 3, in: namespace2)

                // Namespace 3
                Rectangle().fill(Color.red.opacity(0.2)).frame(width: 50, height: 50)
                    .matchedGeometryEffect(id: 0, in: namespace3)
                    .matchedGeometryEffect(id: 1, in: namespace3)
                    .matchedGeometryEffect(id: 2, in: namespace3)
                    .matchedGeometryEffect(id: 3, in: namespace3)

            }

            HStack {
                ForEach(0..<4) { idx in
                    Triangle(direction[idx], colors[idx])
                        .matchedGeometryEffect(id: idx, in: activeNamespace(), isSource: false)
                        .frame(width: 50, height: 50)
                }
            }

            HStack(spacing: 30) {
                Button("Match namespace1") { withAnimation { namespaceInUse = 1 }}
                Button("Match namespace2") { withAnimation { namespaceInUse = 2 }}
                Button("Match namespace3") { withAnimation { namespaceInUse = 3 }}
            }
            Button("Unmatch") { withAnimation { namespaceInUse = 0 }}
        }
    }

    func activeNamespace() -> Namespace.ID {
        if namespaceInUse == 1 {
            return namespace1
        } else if namespaceInUse == 2 {
            return namespace2
        } else if namespaceInUse == 3 {
            return namespace3
        } else {
            return empty_namespace
        }
    }
}
A Matter of Preferences
Do you remember the following example from the series of articles about Preferences?
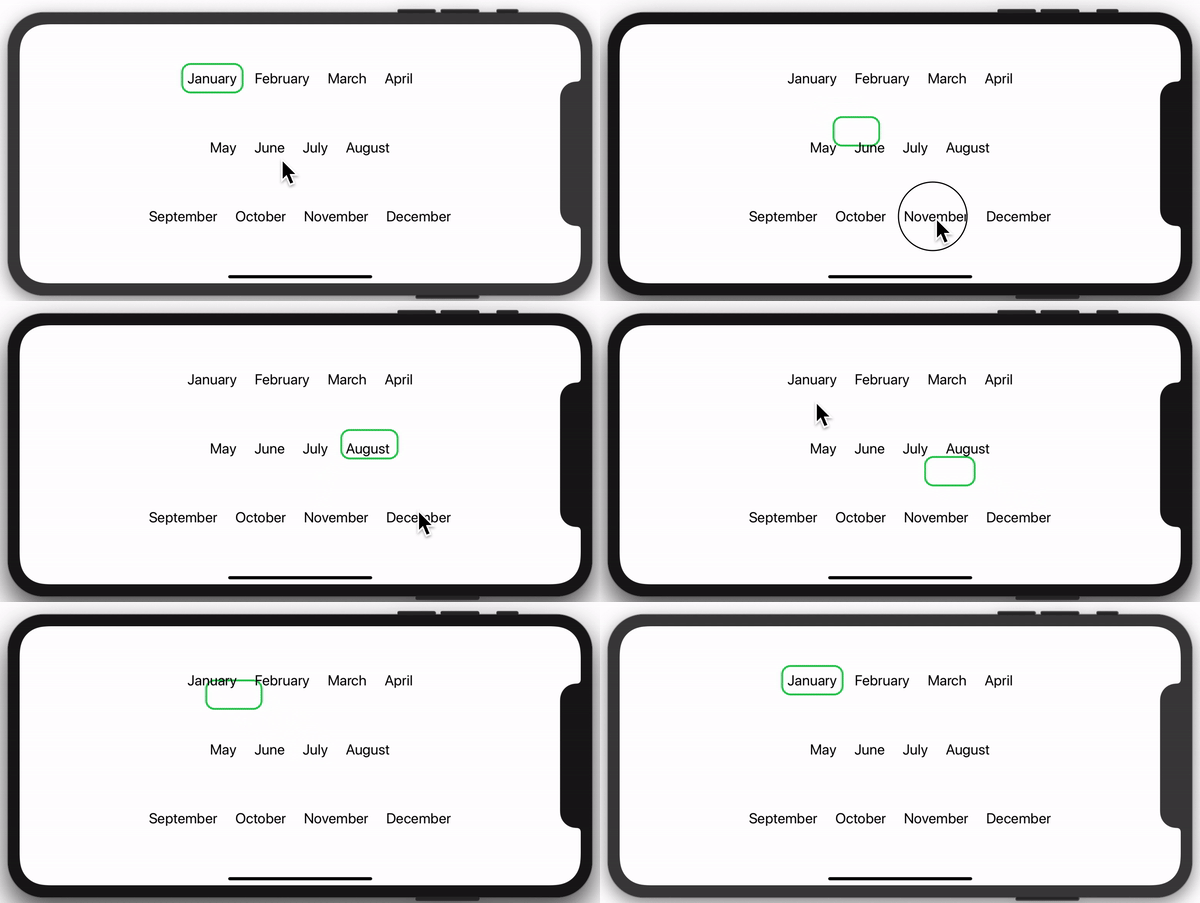
Using matchedGeometryEffect can help us avoid overcomplicating our code and get rid of preferences (not always, but in many cases). See how simple the code is now:
struct ExampleView : View {
    @Namespace var ns
    @State private var selection: Int = 1

    var body: some View {
        VStack(spacing: 20) {
            ForEach(0..<3) { (row: Int) in
                HStack(spacing: 30) {
                    ForEach(1..<5) { (col: Int) in
                        MonthView(selection: $selection, month: row * 4 + col)
                            .matchedGeometryEffect(id: row * 4 + col, in: ns)
                    }
                }
            }
        }.background(
            RoundedRectangle(cornerRadius: 8).stroke(Color.green, lineWidth: 3)
                .matchedGeometryEffect(id: selection, in: ns, isSource: false)
        )
    }

    struct MonthView: View {
        let monthNames = ["January", "February", "March", "April", "May", "June", "July", "August", "September", "October", "November", "December"]
        @Binding var selection: Int
        let month: Int

        var body: some View {
            Text(monthNames[month-1])
                .padding(10)
                .onTapGesture {
                    withAnimation(.easeInOut(duration: 1.0)) {
                        self.selection = month
                    }
                }
        }
    }
}
Follow the Follower
In our last example, we are going to see that we can have views that are both sources and consumers of geometry at the same time. In this case, the red circle is getting its geometry from the yellow circle, and the yellow circle is getting its geometry from an item inside the ScrollView. As we scroll, the matched views follow along. In other words, the yellow circle is both following and being followed.
Pay special attention to the order in which matchedGeometryEffect calls are placed.
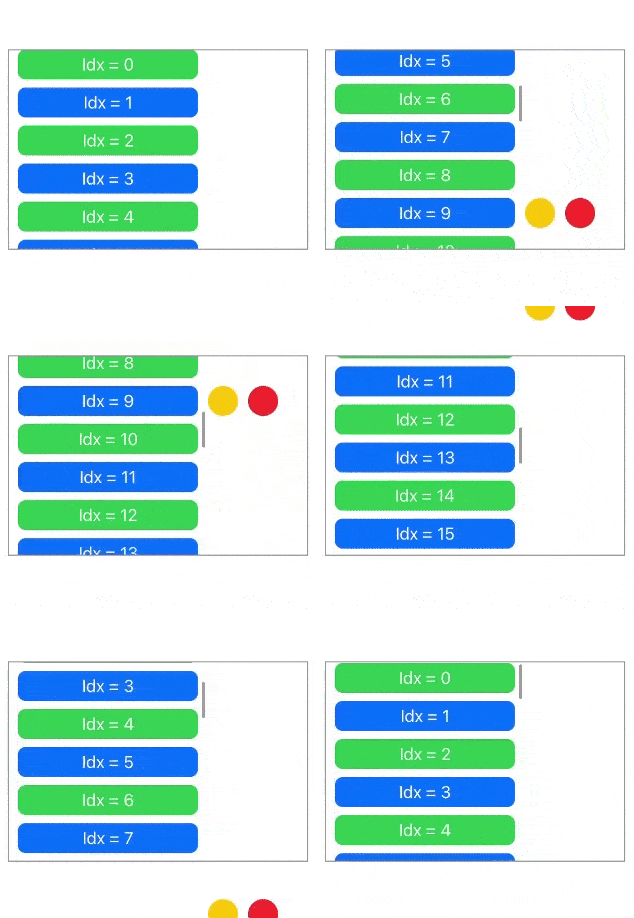
struct ExampleView1: View {
    @Namespace var ns
    @State private var flag = false
    let colors: [Color] = [.green, .blue]

    var body: some View {
        HStack {
            ScrollView {
                ForEach(0..<30) { idx in
                    RoundedRectangle(cornerRadius: 8).fill(colors[idx%2]).frame(height: 30)
                        .overlay(Text("Idx = \(idx)").foregroundColor(.white))
                        .matchedGeometryEffect(id: idx, in: ns, anchor: .trailing, isSource: true)
                        .padding(.horizontal, 10)
                }
            }
            .frame(width: 200)


            Circle().fill(Color.yellow)
                .frame(width: 30, height: 30)
                .matchedGeometryEffect(id: 1000, in: ns, properties: .position, anchor: .trailing, isSource: true)
                .offset(x: 10)
                .matchedGeometryEffect(id: 9, in: ns, properties: .position, anchor: .leading, isSource: false)

            Circle().fill(Color.red)
                .frame(width: 30, height: 30)
                .offset(x: 10)
                .matchedGeometryEffect(id: 1000, in: ns, properties: .position, anchor: .leading, isSource: false)

            Spacer()
        }
        .frame(width: 300, height: 200)
        .border(Color.gray)
    }
}
Hero Animations: Another Approach
I promised to create a hero animation, but unlike the example from Part 1, one that does not require using custom transitions. The concept is simple:
- View A has the size and position where our View B will fly from.
- View B needs to be added WITHOUT transition or animation. That is, the variable that makes the view to appear, should not be inside a withAnimation block.
- View B needs to be matched with View A, so when it is added it is right on top of View A.
- On the View B we add the .onAppear modifier. In that closure, we put a withAnimation block where we do two things: First, we un-match both views (which will make View B to fly to its final position). And second, in the same animation closure, we add all other changes needed for a smooth morphing (e.g., changing corner radius, shadow, etc).
This technique is showcased in the Wildlife Encyclopedia example. The Xcode project is available here.
Summary
In this two-part article, we learned every aspect of this useful modifier. Probably one of the most valued additions to SwiftUI in 2020. Now you have the tools to create animations like the one in the video at the beginning of this article… but if you get stuck, you can always get the Xcode project included.
Please feel free to comment below, and follow me on twitter if you would like to be notified when new articles come out. Until next time!

Amazing, thank you so much for sharing this article !!!
Thanks for the article, Javier! For your bug with no sources, the docs are quite explicit:
If the number of currently-inserted views in the group with isSource = true is not exactly one results are undefined, due to it not being clear which is the source view.
Hi Ingo, thank you for your comment. I’ve read the documentation, but it is not that clear to me. I don’t think they intended to include zero in the statement (although they did). I base this in two things:
1. When you specify more than one view as the source, a message is logged informing you that you did something wrong: “Multiple inserted views in matched geometry group Pair have `isSource: true`, results are undefined”. However, nothing is logged for no views with isSource: true”. I personally see some light there…
2. I understand that having more that one view is a contradiction and the framework has no clear path, but if you specify no source, there is a clear outcome… just don’t match the views. Note that the framework does that already when you have a non-source view with an id that does not belong to any source view. It is basically the same thing! By matching two non-source views just complicates our work, with no real benefit.
I agree with you that the documentation does say that (if we interpret it strictly), but even if that is what they meant I think it deserves we file a bug report. They can call it bug or not, that is ok. But if that is the intention, they should change it, and filing a bug report is the only way I know how to ask for that.
In any case, I realized that I failed to mention that in the article, and I will amend it to make it clear that the documentation does say that. Thanks a lot for pointing it out.
Unbelievably helpful – much in contrast to other content one can find on .matchedGeometryEffect, which is more often than not lacking in some way and doesn’t explore more than one use case.
I would definitely buy a book, were you to publish one on SwiftUI, to support your work. You are an amazing teacher!
Thanks so much for your words. Cheers, Javier.
In your demo code (https://github.com/swiftui-lab/swiftui-hero-animations-no-transitions), when MatchedGeometryEffect work, it does not take the real image to a popover, it shows only effect but the image exists in 2 places? how you do it?
Hi Imbe, unlike the example from Part 1, here, you have two views in different places. However, in order to achieve the “transition” (which is not really a transition, but may look like one), you do the following: match both views so they occupy the same space. You do so, without animations so when the new duplicated view appears, it does so immediately. However, the trick is to start an animation in the onAppear closure of the new view. As soon as it is added, you unmatch it. Because changes in matchedGeometryEffect are animatable, the unmatch will make the second view to move from the matched place (over the first image), to its final position. This is explained with other words in the final section: “Hero Animations: Another Approach”.
thanks, it more clear now.
but if you need to add animation in onAppear by your self, what benefit you have that use matchedGeometryEffect?
Huge benefit! If you don’t have matchedGeometryEffect, you need to know the size and position of the other view, and that is not always trivial in SwiftUI. More often than not, in order to get that information, you need Preferences, GeometryReaders setting @State variables in DispatchQueue.main.async closures (not too nice), or maybe other methods. MatchedGeometryEffect let you forget all about it and it works consistently, unlike the other methods that are prompt to bugs.
Thats really amazing. Thousands of developer hearts are beating faster now. The use cases you should will accelerate the development of great UX done with SwiftUI. Big fan, great work. Learned a lot from your previous articles already. This second part is pure gold.
Thanks, glad you liked it
Thank you for this great article. I am a little cloudy on one issue. In the “Hero Animations: Another Approach” section, when you say “First, we un-match both views”, how exactly is that done? Are you just setting the id parameter to 0?
You are correct. A match between two geometries occur when both views have the same ID+namespace in their corresponding matchedGeometryEffect calls. If at some point, these stop being identical, the match is no longer valid. They effectively: un-match!
“ As a matter of fact, the gray border remains there, as it is placed after the call to matchedGeometryEffect().” Could you elaborate on that? Does the order of modifiers on views matter? I am trying to create a hero transition on my own with weird outcomes. Maybe this is a cause.
Yes, the order matters. There are some cases when that is irrelevant, for example:
but not here:
I’ve written a detailed article that may help you better understand, called Frame Behaviors with SwiftUI
Hi Javier,
Thanks for these excellent articles, they’ve been a great help. I have a question on the last part “Hero Animations: Another Approach”. I have used the technique so that when a view appears it animates from source to final position correctly. However, if I want to do the opposite, i.e. animate back when it disappears this doesn’t seem to work. Is this your experience too or is there a way to do it?
I notice you use a transition in your “Wildlife Encyclopedia” example when the modalview is removed.
Regards,
Euan
I’m guessing this approach does not work for “flying-out” hero animations, because once the onDisappear closure is called, the view is removed from the hierarchy, so that block cannot trigger an animation. In the other case, however, it can, because the view continues to exist after the onAppear execution.
Hi Javier,
Thank you for this thorough tutorial; it provides a nice extensive examples where Apple gives none.
I intended to implement this effect to smoothly transition the swapping of two child views, of parent views iterated through a ForEach. However, this sadly does not work as intended. I was hoping you could take a look and see if you can spot anything.
Because the example is so minimal, I am a bit surprised it did not work as intended.
I put the example on StackOverflow, https://stackoverflow.com/questions/64336161/, to allow any answers to be shared with other developers. If this is not appropriate, reflecting on your article there, please let me know!
Kind regards, Isaiah
Hi Isaiah, for a match to occur, two calls to matchedGeometryEffect must have the same id. In your case however, this never happens.
Also in your code, you are calling matchedGeometryEffect with isSource true for all its occurrences (that’s the default). That means you are trying to make the incoming view (i.e., appearing view) to transition from the position of the outgoing view (i.e., disappearing view). However in your case both views are disappearing and reappearing at the same time and matchedGeometryEffect just cannot handle that (at least not for now).