
In part 6 of the Advanced SwiftUI Animations series, I covered the CustomAnimation protocol, one of the many new additions introduced at WWDC ’23. But the fun does not end there. Now it is time to look at a new view: PhaseAnimator.
If you have been playing around with this new toy, you may have notice there is also a phaseAnimator() modifier. This is just a convenient way of using the view, with a small restriction. We’ll see an example of how to use the modifier at the end of the article.
PhaseAnimator
The PhaseAnimator view let us animate a view through a series of phases. Phases are specified with types that adopt the Sequence protocol. But do not worry, a common Swift array will do.
Endless Animation
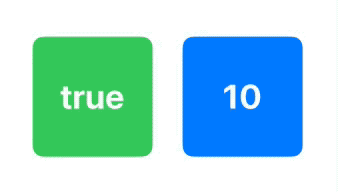
In its simplest form, the view will animate indefinitely, with a default spring animation for each phase. Here are two examples. One has true and false as its phases, the other iterates through numbers 10, 20, 30, 40. These are just some examples, but you could use other types. For example, a collection of enum values. I’ll show such an example later on.
struct ExampleView: View {
    var body: some View {
        HStack(spacing: 30) {

            PhaseAnimator([true, false]) { phase in
                RoundedRectangle(cornerRadius: phase ? 10 : 30)
                    .fill(.green)
                    .frame(width: 120, height: 120)
                    .overlay{ Text(phase ? "true" : "false") }
            }

            PhaseAnimator([10, 20, 30, 40]) { phase in
                RoundedRectangle(cornerRadius: phase)
                    .fill(.blue)
                    .frame(width: 120, height: 120)
                    .overlay { Text("\(Int(phase))") }
            }
        }
        .font(.largeTitle).fontWeight(.bold).foregroundColor(.white)
    }
}
Triggered Animation
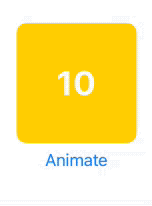
If you only need the animator to complete a single cycle (i.e., go through each phase only once), you can add the trigger parameter. This will make the PhaseAnimator start a cycle when the trigger value changes, but it will not repeat until the trigger value is modified again.
struct ExampleView: View {
    @State var animate = false

    var body: some View {
        VStack {
            PhaseAnimator([10, 20, 30, 40, 50, 60], trigger: animate) { phase in
                RoundedRectangle(cornerRadius: phase)
                    .fill(.yellow)
                    .frame(width: 120, height: 120)
                    .overlay { Text("\(Int(phase))") }
            }
            .font(.largeTitle).fontWeight(.bold).foregroundColor(.white)

            Button("Animate") {
                animate.toggle()
            }
        }
    }
}
Note that the animator starts with a phase value of 10 and ends when the phase loops back to 10 again.
Animation Types
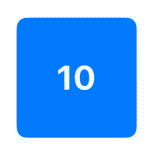
By default, all phases use the .spring animation, but you can add a closure that returns which animation to apply at each phase change. In this example, each phase change uses easeInOut, but with a different duration: 5/phase. With this expression, the higher the phase value, the shorter the animation will be. In this example, it goes from 5/10 = 0.5 seconds for phase 10 to 5/60 = 0.08333 seconds for phase 60.
struct ExampleView: View {
    var body: some View {
        PhaseAnimator([10, 15, 20, 25, 30, 35, 40, 45, 50, 55, 60]) { phase in
            RoundedRectangle(cornerRadius: phase)
                .fill(.blue)
                .frame(width: 120, height: 120)
                .overlay { Text("\(Int(phase))") }
        } animation: { phase in
            return Animation.easeInOut(duration: 5/phase)
        }
        .font(.largeTitle).fontWeight(.bold).foregroundColor(.white)
    }
}
To save you a headache, please note that the first animation to actually be executed, is the one for phase 20 (not 10). This is because the view appears with the first phase (10) and then animates towards the second phase (20). At the end, the view will animate towards the first phase. This could be a little confusing at first, so bear it in mind.
Suppose we simplify the example to have less phases: 10, 20, 30, 40, 50, 60 and an easeInOut animation with 10/phase. The graphic shows how the animation will occur. The arrow numbers indicate the duration of the animation (10/phase):

If you want to test this out, use the example from the Triggered Animation section above and add the following animation closure to the PhaseAnimator:
animation: { phase in

    let _ = print("phase = \(phase)")

    return Animation.easeInOut(duration: 10/phase)
}
This will print to the console the phase values the closure gets. You will see the following values, in this order: 20, 30, 40, 50, 60, 10. That is, it starts with 20 and ends with 10!
A Little Trouble Ahead
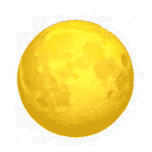
Consider this simple example:
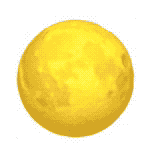
Unfortunately, the following code will not produce the above animation. It will require a small tweak:
struct ExampleView: View {
    let moonPhases = "🌕🌖🌗🌘🌑🌒🌓🌔".map { String($0) }

    var body: some View {
        PhaseAnimator(moonPhases) { phase in
            Text(phase)
        } animation: { _ in
          .easeInOut(duration: 1.0)
        }
        .font(.system(size: 120))
    }
}
The Text view does not animate when the string changes value. I’m almost certain this is a bug in the framework, but in any case, it has multiple workarounds:
One way to solve it is using the id() modifier:
Text(phase).id(phase)By changing the id in each phase of the animation, we are destroying and recreating the Text view, forcing SwiftUI to produce a transition animation. Because the default transition is .opacity, we will obtain the desired result. But if you want to have some fun, you can change the transition to something else:
Text(phase).id(phase).transition(.scale)If you want to learn more about the effects of using .id(), check my old post Identifying SwiftUI views.
Destroying and recreating the view for each phase may be a bit too much, but there are other ways to force SwiftUI to animate the Text view without destroying. We can add a visual effect that is small enough to be noticeable. SwiftUI will be forced to redraw the view (and animate it), but the effect will not produce any evident output (apart from the animation). In this example we will change the opacity of the view by a very small amount. Odd and even phases will have an opacity of 0.99 and 1.0 respectively. Because opacity is different in each phase change, the view will animate. Now we are no longer animating a transition, but the actual text change.
Text(phase)
    .opacity(moonPhases.firstIndex(of: phase)! % 2 == 0 ? 1.0 : 0.99)
I have only seen this problem with Text views, but be aware, in case you come across the same problem in other scenarios. Fortunately, the cases when you will need to implement a workaround are very few.
Using .phaseAnimator()
For convenience, you may also use the phaseAnimator() method. It receives the same parameters as PhaseAnimator, but the @ViewBuilder closure has an additional parameter with the view to modify.
Some animations can be equally achieved with both options, but the modifier is more limited. It allows you to use the phase value to modify a view, but it does not allow you to change its calling parameters, as is the case in the first examples where the cornerRadius parameter is set according to the phase.
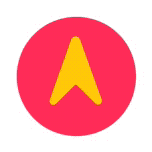
enum CardinalPoint: Double, CaseIterable {
    case north = 0
    case east = 90
    case south = 180
    case west = 270
    case north_360 = 360

    // SF Symbol (↗) is 45 degrees rotated, so we substract it to compensate
    var angle: Angle { .degrees(self.rawValue - 45.0) }
}

struct ExampleView: View {

    var body: some View {

        Image(systemName: "location.circle.fill")
            .symbolRenderingMode(.palette)
            .foregroundStyle(.yellow, .pink)
            .font(.system(size: 120))
            .phaseAnimator(CardinalPoint.allCases) { content, phase in

                content
                    .rotationEffect(phase.angle)

            } animation: { phase in
                if phase == .north {
                    .linear(duration: 0)
                } else {
                    .bouncy(extraBounce: 0.2)
                }
            }
    }
}
This example also shows how you can use enum cases as your animator’s phases.
Continuing the Journey
In this new part 7 of the series (the second this year), we have seen how to work with PhaseAnimator. In the next installment, we’ll dive deep into the world of KeyframeAnimator, unlocking even more exciting possibilities for your SwiftUI animations.
To ensure you don’t miss out on the latest updates and articles, follow me on 𝕏 (@SwiftUILab), where I will be posting notifications when new articles are available. Happy Coding!